Kubernetes 极简备忘录
{Back to Index}
Table of Contents
- 1. 应用组件
- 2. Volume
- 3. Taint/Toleration
- 4. 网络
- 5. Service Account
- 6. Role&RoleBinding
- 7. Tips
- 7.1. 安装 master/worker
- 7.2. YAML 模板
- 7.3. 查看资源版本信息
- 7.4. 更新 join command
- 7.5. 删除 label
- 7.6. 创建 KUBECONFIG
- 7.7. 创建用于测试的容器
- 7.8. Helm 简单使用
- 7.9. 更新证书
- 7.10. 查看 etcd
- 7.11. 安装私有仓库
- 7.12. 自定义输出格式
- 7.13. 暂停调度
- 7.14. 查看 Requests/Limits 使用情况
- 7.15. drain/cordon Node
- 7.16. 升级流程
- 7.17. 备份所有应用配置
- 7.18. 查看所有 Named Group 【非 Core Group】
- 7.19. 本地端口转发
- 7.20. 获取所有节点 IP 【jsonpath用法】
- 7.21. 强制删除 Pod
- 7.22. 拷贝本地文件
1 应用组件
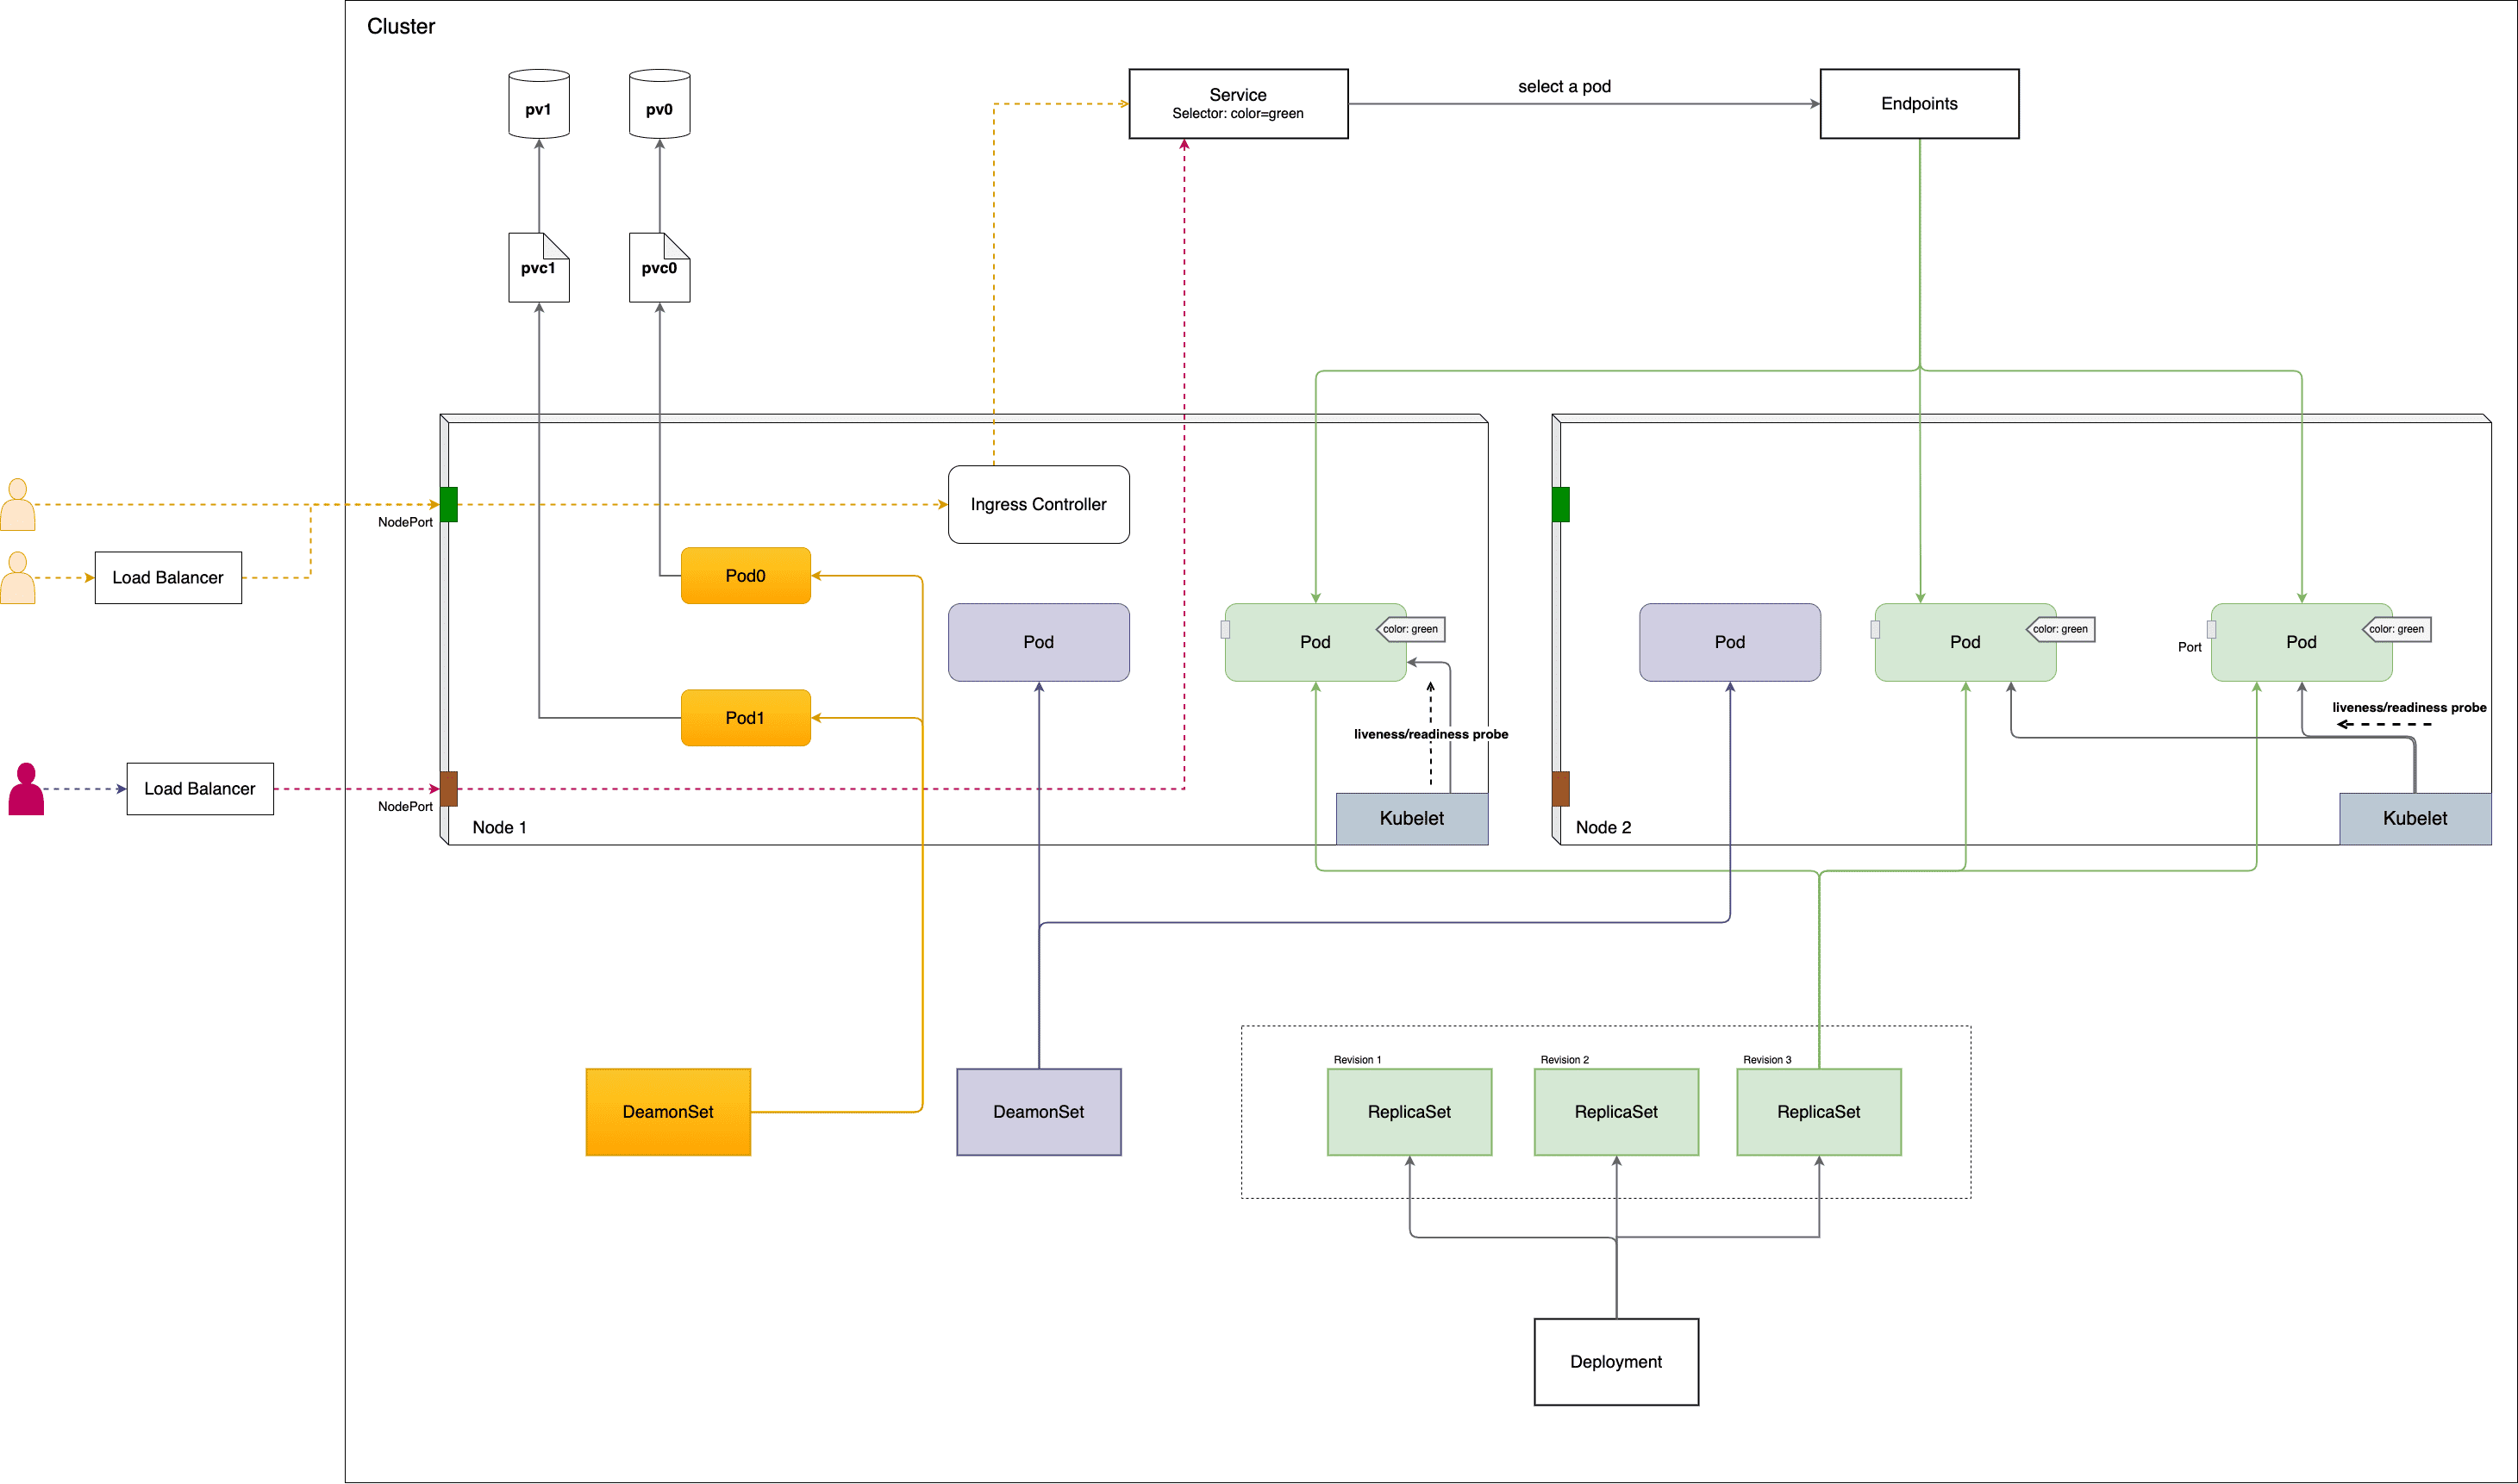
Figure 1: 应用组件概览
1.1 Pod
Pod 是一切资源的中心,Kubernetes 可以看做是 Pod 编排系统,大多数 Kubernetes 资源都是为了创建,监控,更新 Pod 而设计的。
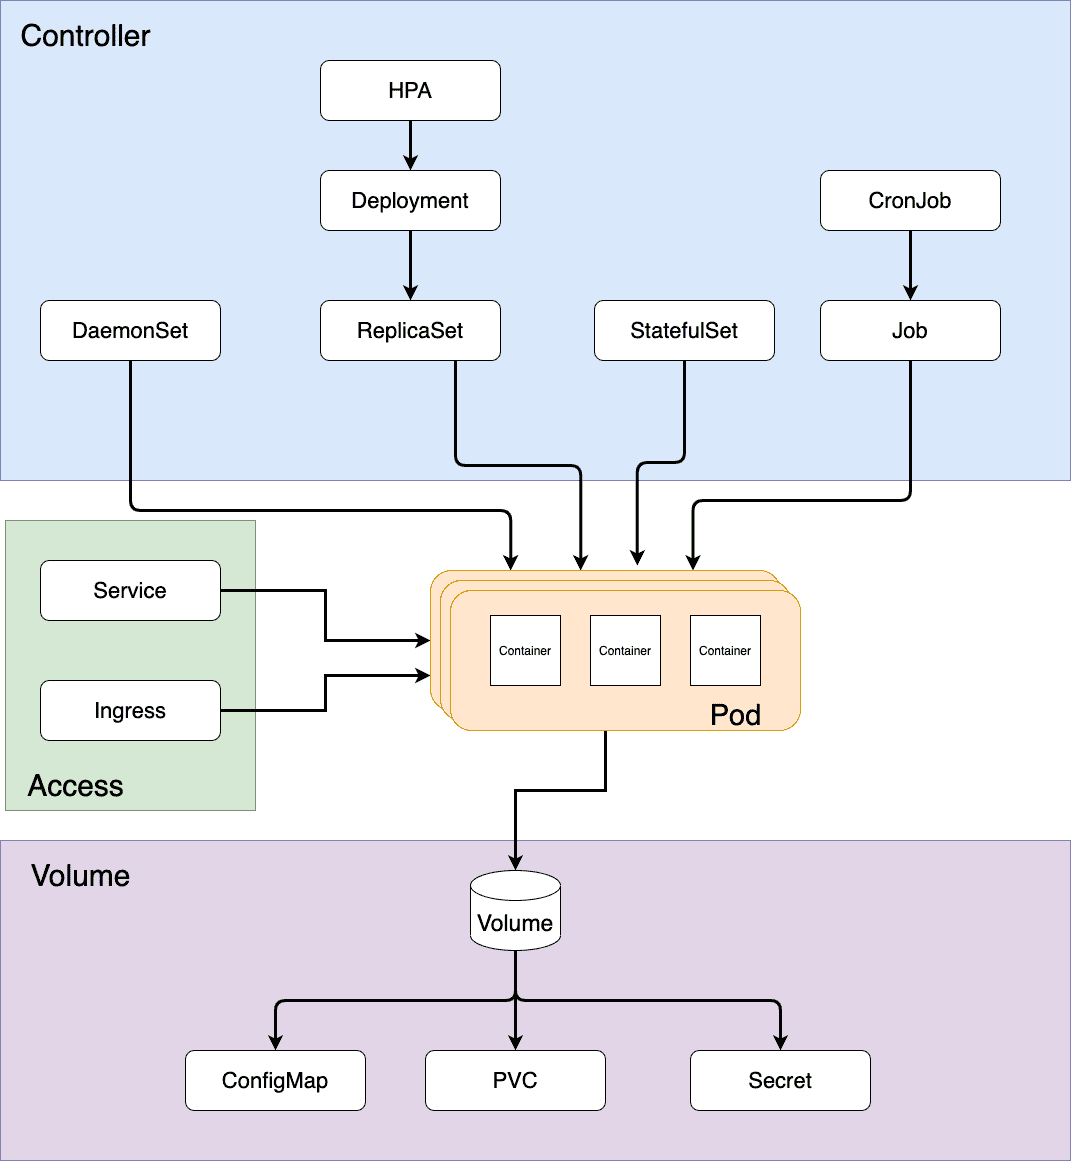
Figure 2: 以 Pod 为中心的编排系统
1.1.1 Command/Argument
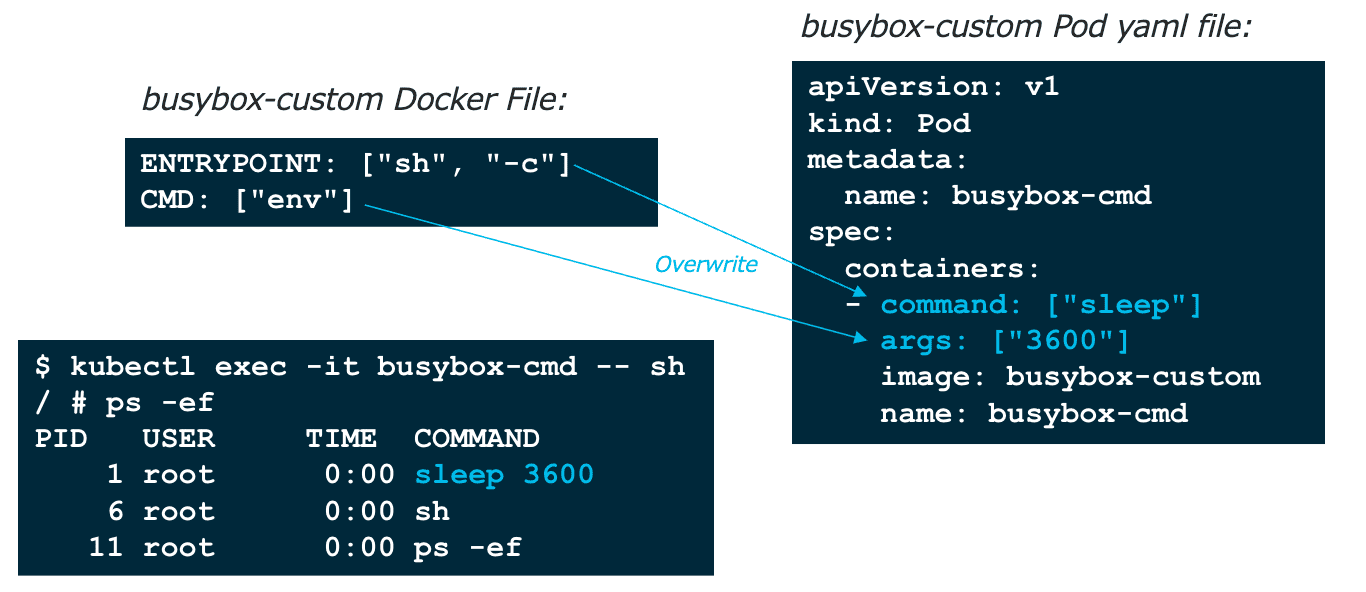
Figure 3: Pod command/args 与 Dockerfile ENTRYPOINT/CMD 对应关系
1.1.1.1 ENTRYPOINT/CMD
nginx DockerFile: 【实际运行的是: /docker-entrypoint.sh nginx -g 'daemon off;' 】
...
ENTRYPOINT ["/docker-entrypoint.sh"]  # ENTRYPOINT 是必须要执行的,不能被覆盖
EXPOSE 80
STOPSIGNAL SITTERM
CMD ["nginx" "-g" "daemon off;"] # 如果有指定 ENTRYPOINT ,CMD 则作为 ENTRYPOINT 的参数
                                 # CMD 是可以被覆盖的,例如 docker run nginx my-command ,则 my-command 就把 CMD 给覆盖掉了
busybox DockerFile: 【实际运行的就是: sh 】
ADD file ... in /
CMD ["sh"]        # busybox 没有定义 ENTRYPOINT ,因此运行容器时可以指定任意命令,从而将 CMD 覆盖掉
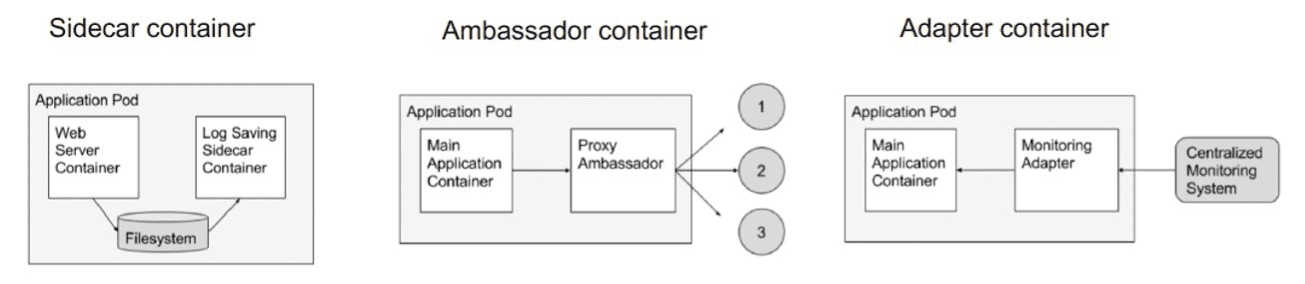
1.1.2 设计模式
1.1.3 Static Pod
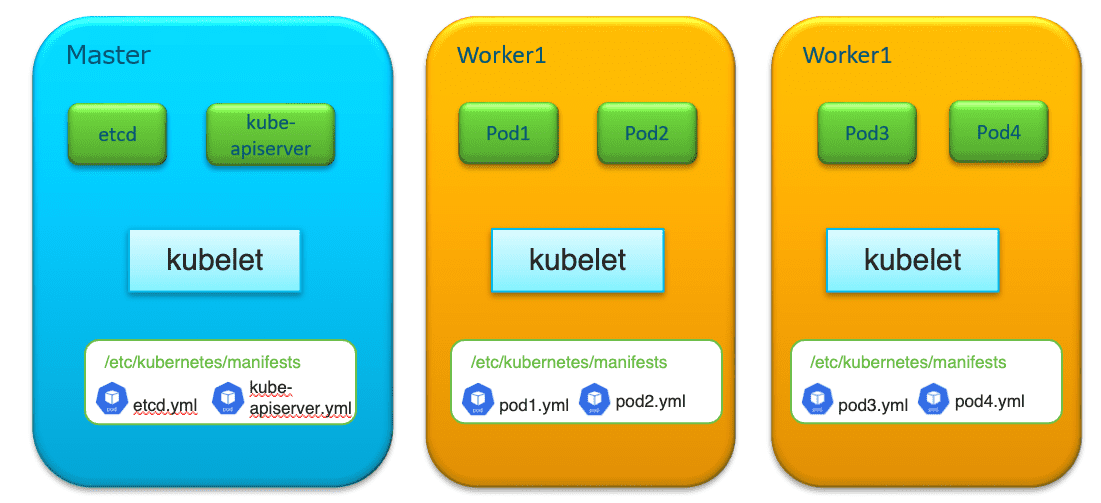
Static Pod 由 kubelet 直接管理 。【没有在 kube-apiserver 中注册过,但是 apiserver 可以检测到 static pod 的存在】
默认情况下,static pod 由 /etc/kubernetes/manifests/ 目录下的 Pod 定义文件所定义并由 kubelet 进行创建
【Pod naming pattern: <pod-name>-<node-name> 】。
想要删除 static pod ,只有通过删除定义文件。
# 如何找到 manifests 目录:
$> ps -ef | grep [/]usr/bin/kubelet
root         854       1  2 11:49 ?        00:07:23 /usr/bin/kubelet --bootstrap-kubeconfig=/etc/kubernetes/bootstrap-kubelet.conf --kubeconfig=/etc/kubernetes/kubelet.conf --config=/var/lib/kubelet/config.yaml --network-plugin=cni --pod-infra-container-image=k8s.gcr.io/pause:3.6
$> grep static /var/lib/kubelet/config.yaml
staticPodPath: /etc/kubernetes/manifests
控制平面的 Pods ,如 etcd, kube-apiserver, kuber-controller 以及 kube-scheduler , 它们都是 static Pod 。
(master)$> ls -l /etc/kubernetes/manifests/
total 16
-rw------- 1 root root 2209 May 12 22:42 etcd.yaml
-rw------- 1 root root 4004 May 12 22:42 kube-apiserver.yaml
-rw------- 1 root root 3516 May 12 22:42 kube-controller-manager.yaml
-rw------- 1 root root 1435 May 12 22:42 kube-scheduler.yaml
1.2 Deployment
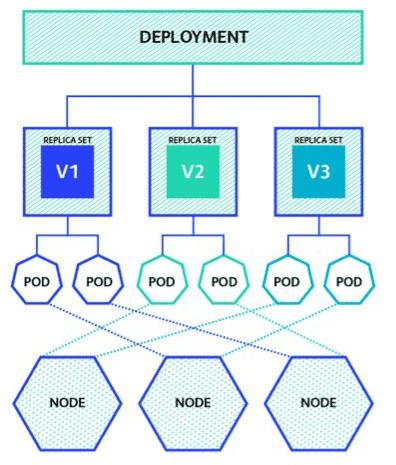
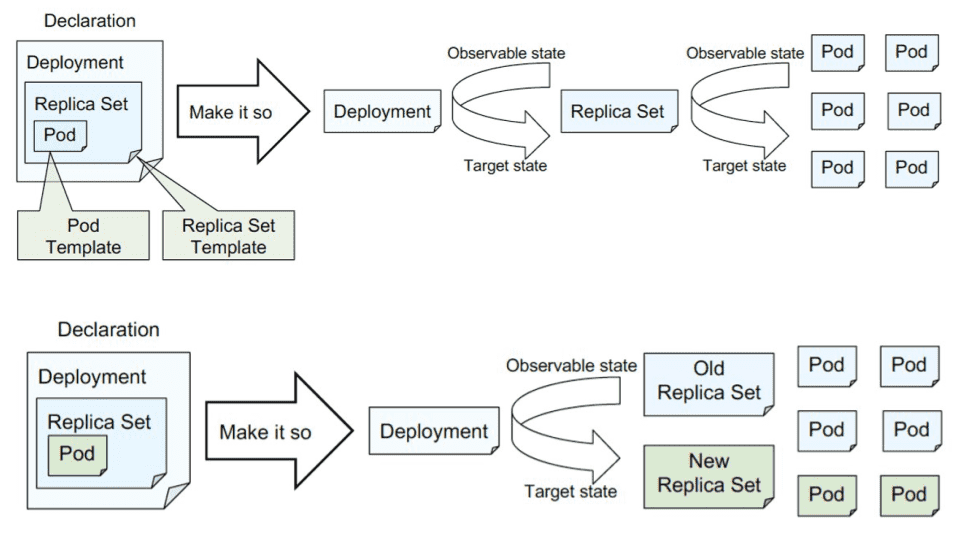
1.2.1 RollingUpdate/rollout
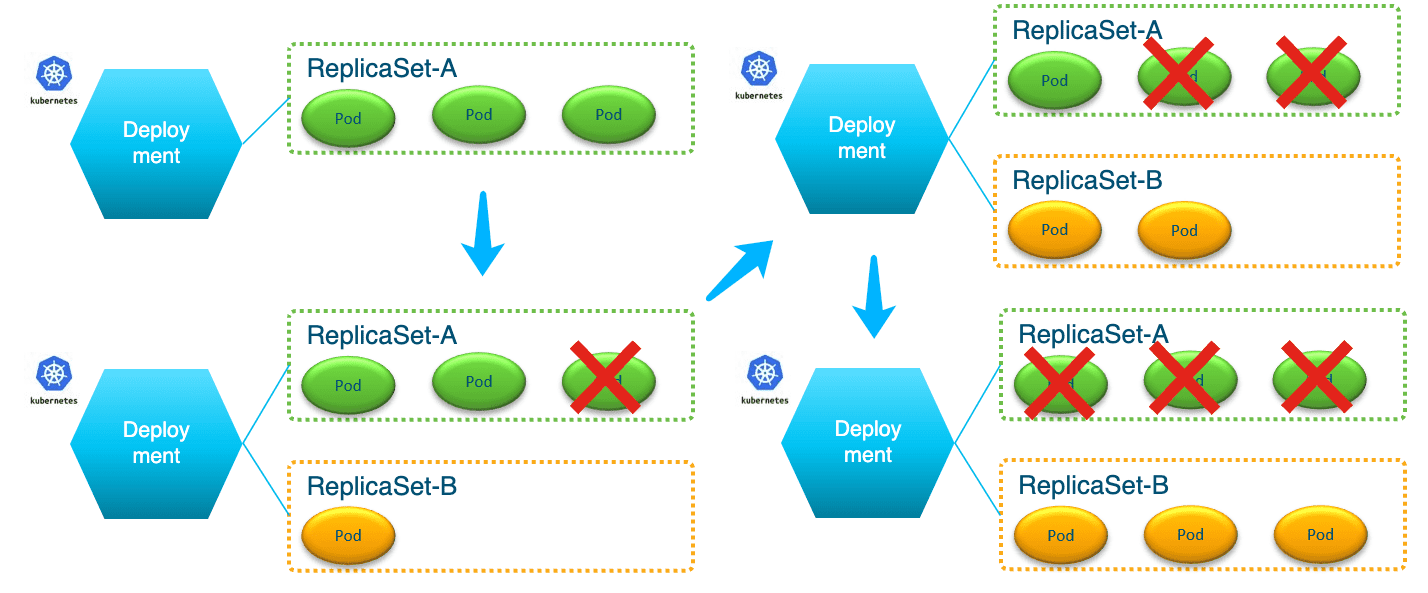
滚动升级与回退示例
$> k create deployment my-deployment --image=ruanhao/kubia:v1 --replicas=3 deployment.apps/my-deployment created $> k set image deployment/my-deployment kubia=ruanhao/kubia:v2 --record Flag --record has been deprecated, --record will be removed in the future deployment.apps/my-deployment image updated $> k get all NAME READY STATUS RESTARTS AGE pod/my-deployment-7df8999569-b9fwq 1/1 Running 0 14s pod/my-deployment-7df8999569-j6226 1/1 Running 0 16s pod/my-deployment-7df8999569-wm5g8 1/1 Running 0 12s NAME TYPE CLUSTER-IP EXTERNAL-IP PORT(S) AGE service/kubernetes ClusterIP 10.96.0.1443/TCP 3m25s NAME READY UP-TO-DATE AVAILABLE AGE deployment.apps/my-deployment 3/3 3 3 2m16s NAME DESIRED CURRENT READY AGE replicaset.apps/my-deployment-6dcbbf6fb4 0 0 0 2m16s # old version of rs replicaset.apps/my-deployment-7df8999569 3 3 3 16s # new version of rs $> k rollout history deployment my-deployment # 查看历史 deployment.apps/my-deployment REVISION CHANGE-CAUSE 1 2 kubectl set image deployment/my-deployment kubia=ruanhao/kubia:v2 --record=true $> k describe deployment/my-deployment | grep Image Image: ruanhao/kubia:v2 $> k rollout undo deployment my-deployment # 回退 deployment.apps/my-deployment rolled back $> k describe deployment/my-deployment | grep Image Image: ruanhao/kubia:v1 $> k get all NAME READY STATUS RESTARTS AGE pod/my-deployment-6dcbbf6fb4-2h2rs 1/1 Running 0 118s pod/my-deployment-6dcbbf6fb4-2hnnp 1/1 Running 0 2m pod/my-deployment-6dcbbf6fb4-r775p 1/1 Running 0 117s NAME TYPE CLUSTER-IP EXTERNAL-IP PORT(S) AGE service/kubernetes ClusterIP 10.96.0.1 443/TCP 10m NAME READY UP-TO-DATE AVAILABLE AGE deployment.apps/my-deployment 3/3 3 3 9m19s NAME DESIRED CURRENT READY AGE replicaset.apps/my-deployment-6dcbbf6fb4 3 3 3 9m19s replicaset.apps/my-deployment-7df8999569 0 0 0 7m19s # 仍然存在
1.3 Service
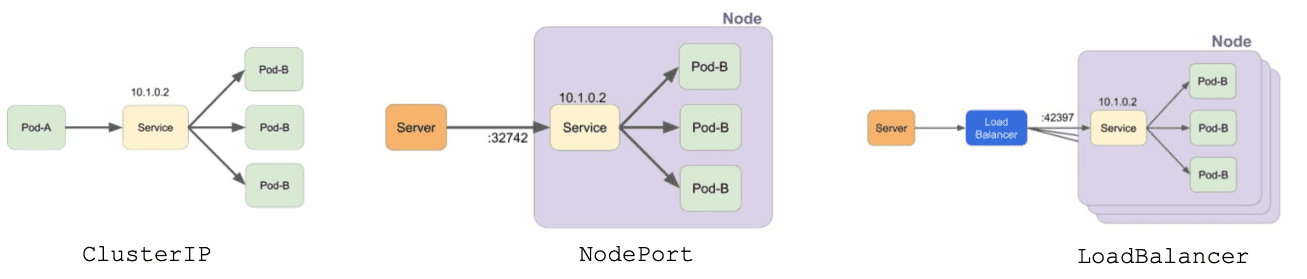
Figure 9: ClusterIP 是默认的 Service 类型
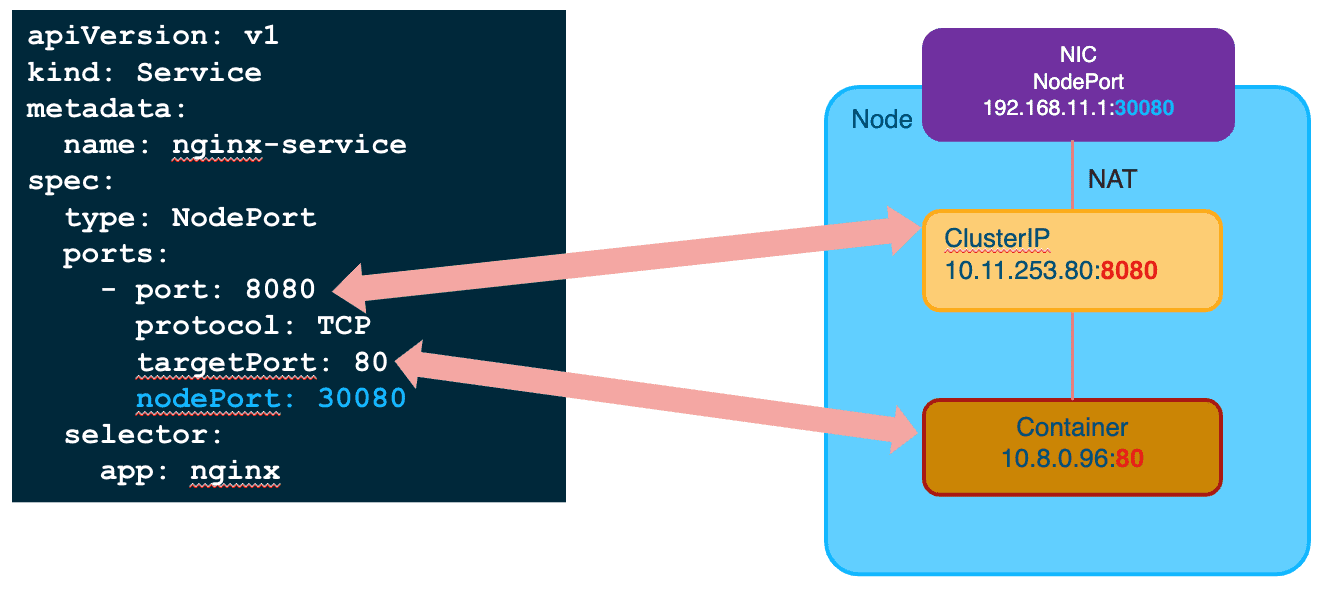
Figure 10: 端口对应关系
1.4 Ingress
Ingress 可以看成提供 NodePort/Loadbalance 服务的 HTTP 反向代理。
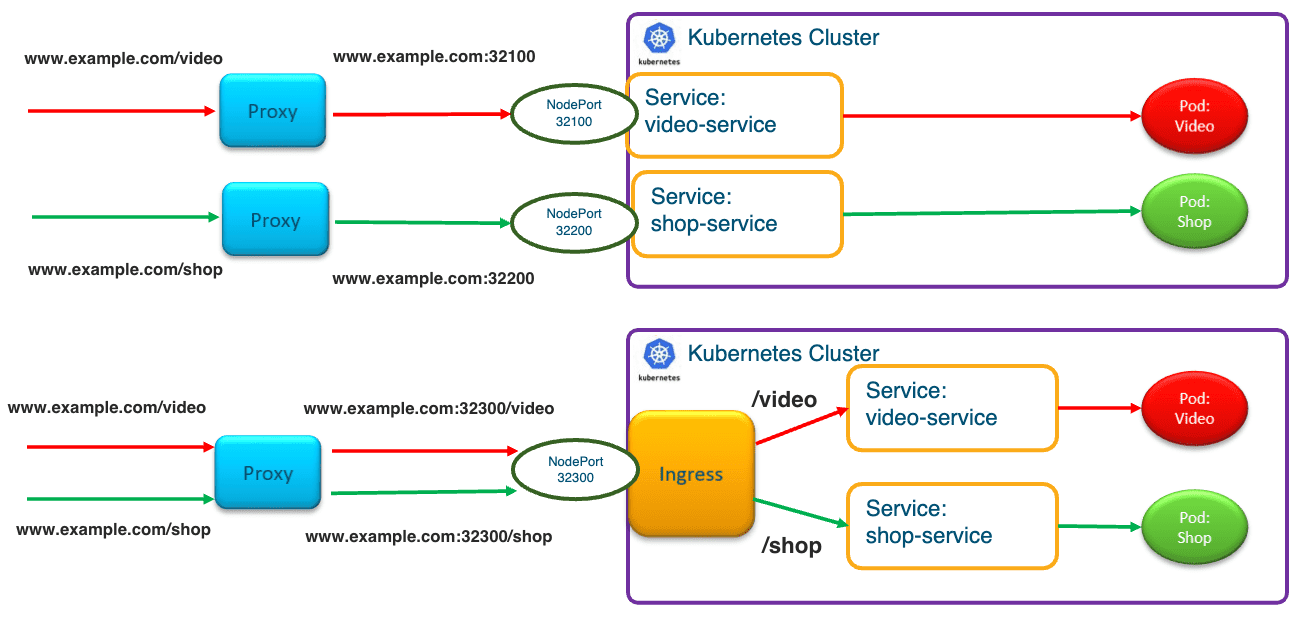
Figure 11: Ingress 与 Service 的比较
1.4.1 安装 (Bare metal/NodePort)
# k8s version must > 1.19
kubectl apply -f https://raw.githubusercontent.com/kubernetes/ingress-nginx/controller-v1.2.0/deploy/static/provider/baremetal/deploy.yaml
1.4.2 部署示例
1.4.2.1 基于主机名
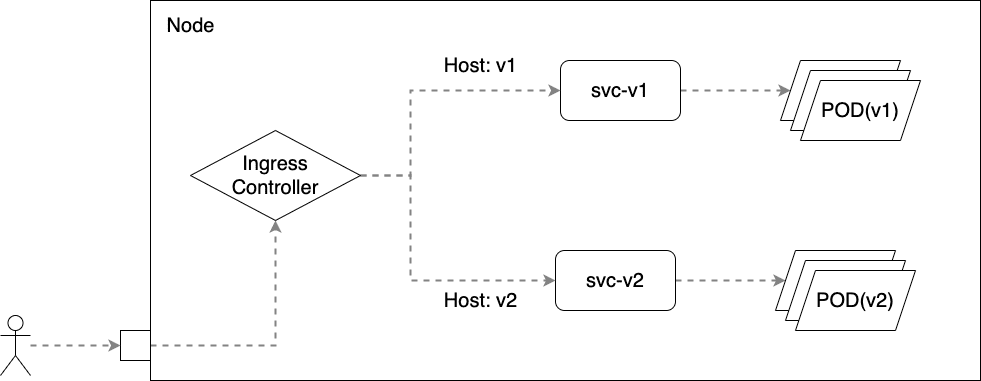
$ k get service -n ingress-nginx NAME TYPE CLUSTER-IP EXTERNAL-IP PORT(S) AGE ingress-nginx-controller NodePort 10.110.205.9480:30590/TCP,443:32265/TCP 11h ingress-nginx-controller-admission ClusterIP 10.110.98.216 443/TCP 11h $ curl v1.finditnm.com:30590 Demo(v1) [POD: kubia-v1-56567467d5-qcwvh] $ curl v2.finditnm.com:30590 Demo(v2) [POD: kubia-v2-8d64b5745-78wq4]
1.4.2.2 基于路径
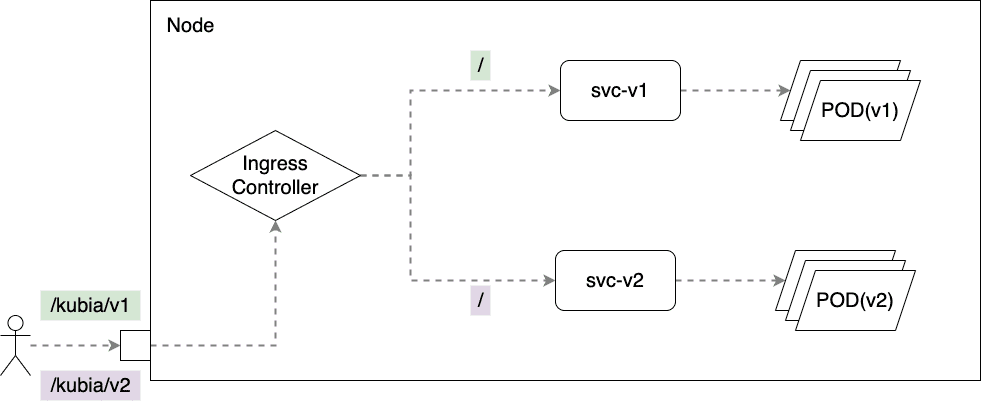
# 留意两种不同的 rewrite 写法的效果
$ curl www.finditnm.com:30590/kubia/v1/hello/world
demo(v1), uri: /, pod: kubia-v1-56567467d5-x9rtn, ip: 192.168.1.25
$ curl www.finditnm.com:30590/kubia/v2/hello/world
demo(v2), uri: /hello/world, pod: kubia-v2-8d64b5745-6h5zd, ip: 192.168.1.24
2 Volume
在 .spec.volumes 中定义 Volume 并在 .spec.contaners[].volumeMounts 完成挂载。
2.1 emptyDir
emptyDir 会随 Pod 一起删除,通常用于在 多个容器间 共享存储。
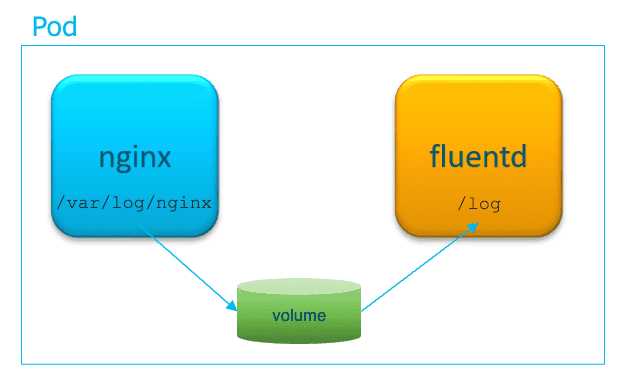
apiVersion: v1
kind: Pod
metadata:
  name: multi-pod
spec:
  containers:
  - name: nginx-container
    image: nginx:latest
    volumeMounts:
    - name: log-dir
      mountPath: /var/log/nginx
  - name: fluentd-container
    image: fluentd:latest
    volumeMounts:
    - name: log-dir
      mountPath: /log
  volumes:
  - name: log-dir
    emptyDir: {}
emptyDir 类型的卷,实际上是在承载 Pod 的工作节点的 实际磁盘 上创建出来的。可以设置 medium: Memory 使用内存(tmfs) 来创建卷。
2.2 PV/PVC
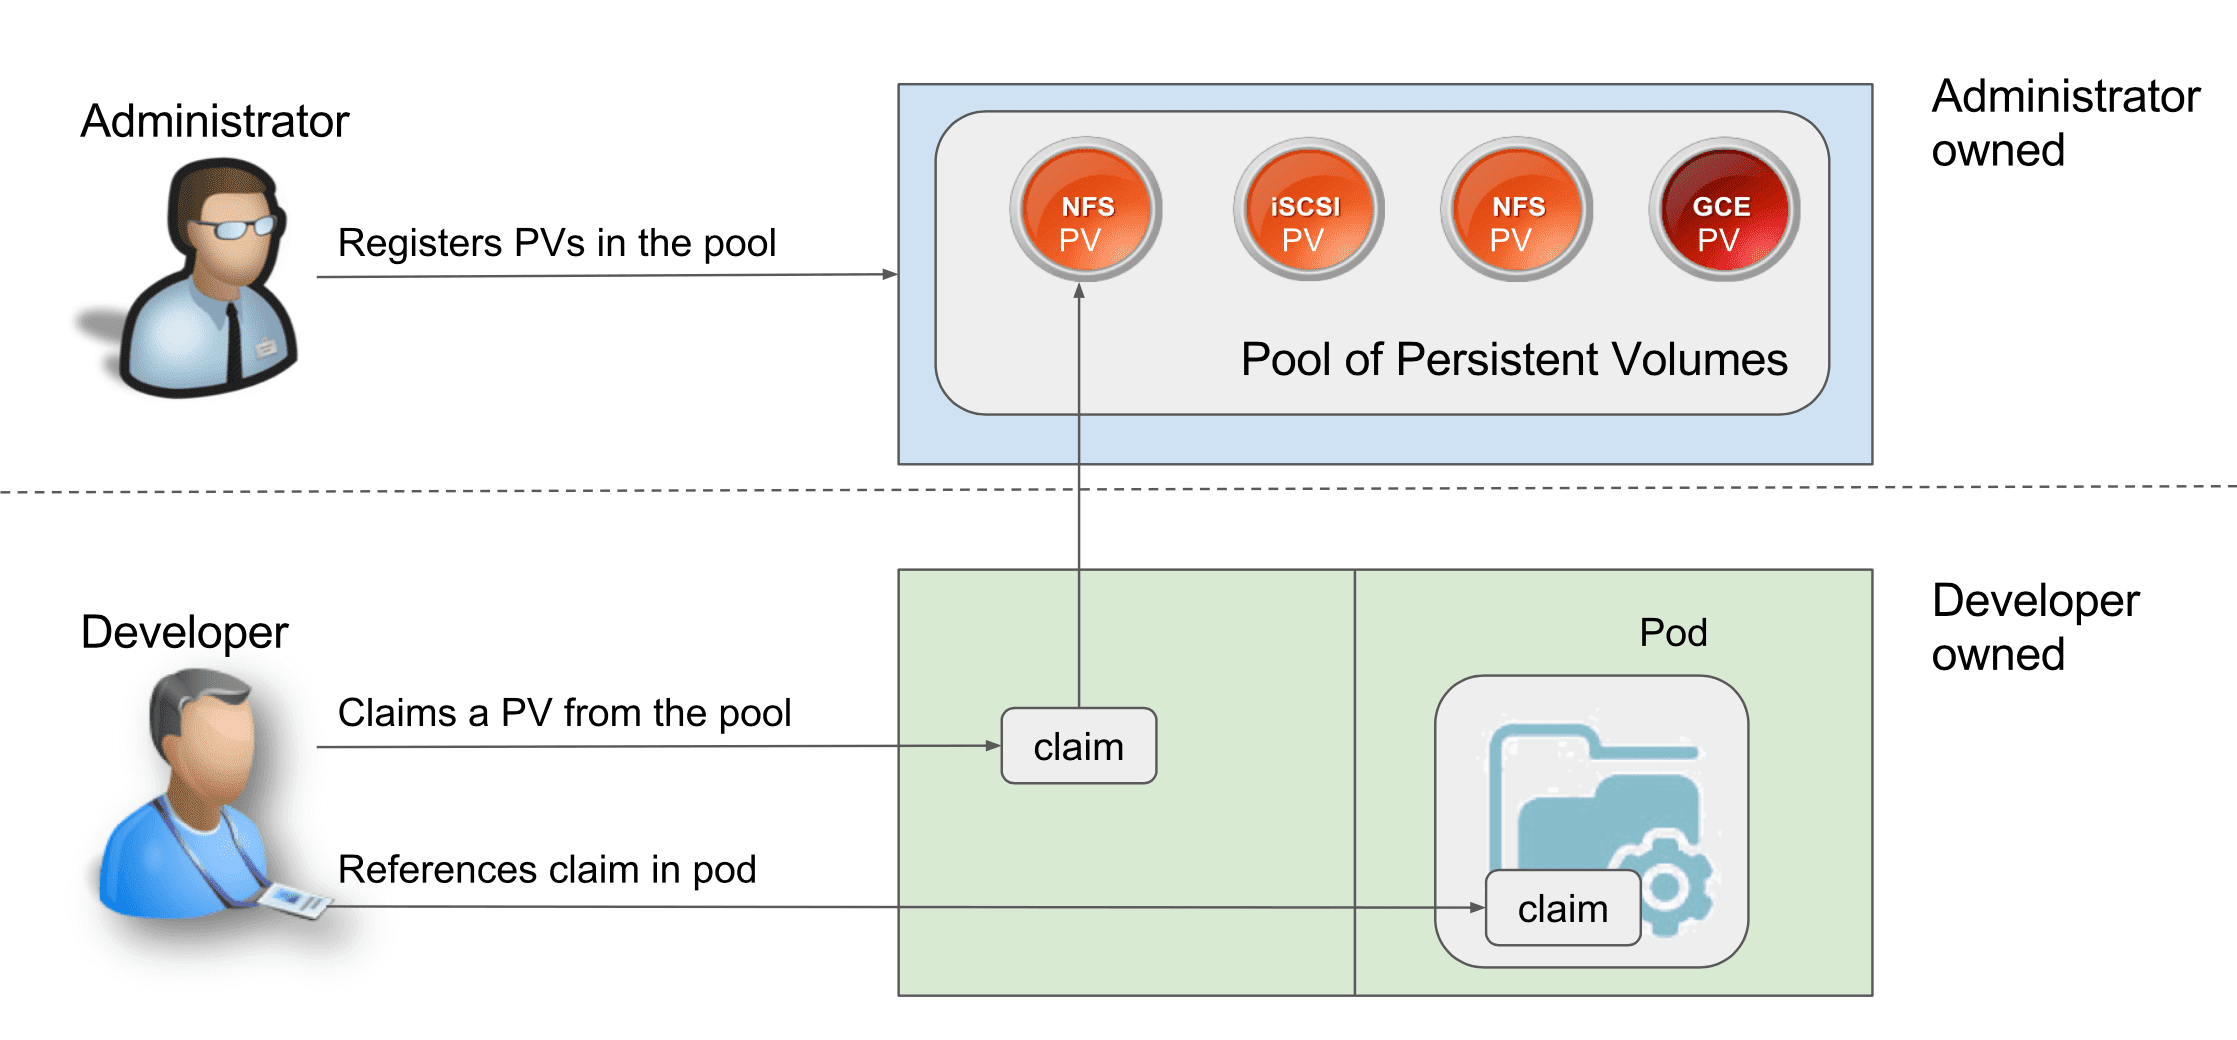
Figure 15: PV 是 集群级别 的资源,PVC 是 应用级别 的,且 PV 和 PVC 是 一对一 的绑定
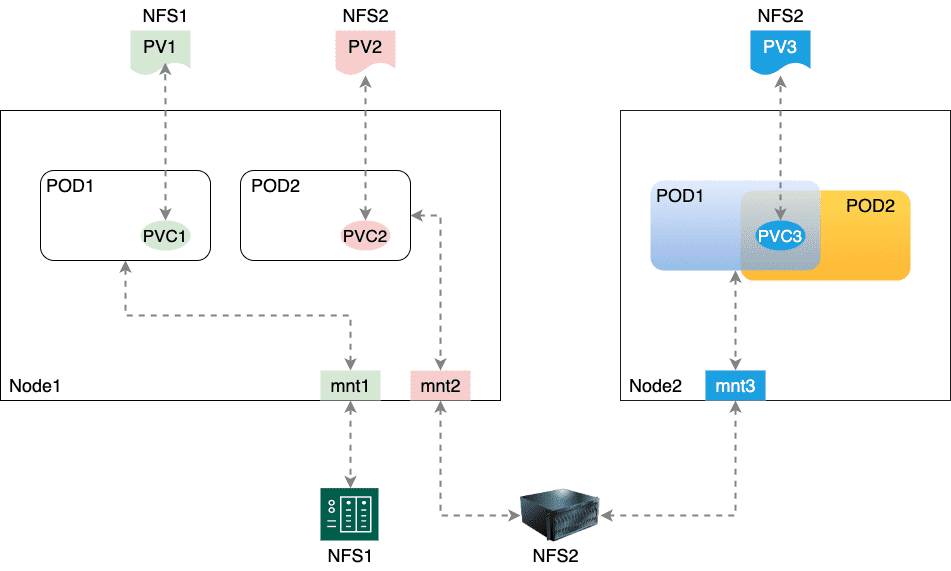
Figure 16: PV 本质是定义如何创建挂载点,PVC 则是使用挂载点,PVC 可以被不同 Pod 共享
2.2.1 Reclaim Policy
- Retain (Pod 删除后,Volume 中内容保留)
- Recycle (Pod 删除后,Volume 中内容也全被删除)
- Delete (通常用于云服务提供商所提供的的 Volume ,在 Pod 删除后自动将 AWS EBS/GCE PD/Azure Disk 等资源删除)
2.2.2 Access Mode
Access Mode 对于 PV 而言是定义 Volume 的访问权限的,而对于 PVC 而言,则是用于 匹配 PV 的。
ReadWriteOnce, ReadOnlyMany 和 ReadWriteMany 是针对 Node 而言的,即一个 PV 是否能在多个物理主机上创建挂载点,比如 PV1(ReadWriteOnce) 一开始与 PVC1 绑定并在 Node1 上创建了挂载点,解绑后又与另一个 PVC2 绑定了,那么使用 PVC2 的 Pod 仍然需要位于 Node1 上。
ReadWriteOncePod 表示 PVC 不能被多个 Pod 共享。
针对不同的 Volume 类型,支持的 Access Mode 也不相同,使用时需要查阅文档。1
2.2.3 绑定/匹配
apiVersion: v1
kind: PersistentVolume
metadata:
  name: my-pv
  labels:
    type: nfs
spec:
  storageClassName: nfs
  capacity:
    storage: 10Gi
  accessModes:
    - ReadWriteOnce
  persistentVolumeReclaimPolicy: Recycle
  nfs:
    path: /nfsdata
    server: 10.74.107.7
apiVersion: v1
kind: PersistentVolumeClaim
metadata:
  name: my-pvc
spec:
  storageClassName: nfs
  resources:
    requests:
      storage: 1Gi
  accessModes:
    - ReadWriteOnce
  selector:
    matchLabels:
      type: nfs
2.2.4 静态 PV 配置示例 2

Figure 17: 每个节点都要安装 nfs-common
YAML:
$ k get pod -o wide NAME READY STATUS RESTARTS AGE IP NODE NOMINATED NODE READINESS GATES static-pv-demo-pod 1/1 Running 0 53s 192.168.2.63 worker2$ k get pvc -o wide NAME STATUS VOLUME CAPACITY ACCESS MODES STORAGECLASS AGE VOLUMEMODE nfspvc Bound nfspv 10Gi RWO nfs 60s Filesystem $ k get pv -o wide NAME CAPACITY ACCESS MODES RECLAIM POLICY STATUS CLAIM STORAGECLASS REASON AGE VOLUMEMODE nfspv 10Gi RWO Recycle Bound default/nfspvc nfs 63s Filesystem $ k describe pv nfspv Name: nfspv Labels: Annotations: pv.kubernetes.io/bound-by-controller: yes Finalizers: [kubernetes.io/pv-protection] StorageClass: nfs Status: Bound Claim: default/nfspvc Reclaim Policy: Recycle Access Modes: RWO VolumeMode: Filesystem Capacity: 10Gi Node Affinity: Message: Source: Type: NFS (an NFS mount that lasts the lifetime of a pod) Server: 10.74.107.7 Path: /nfsdata ReadOnly: false Events:
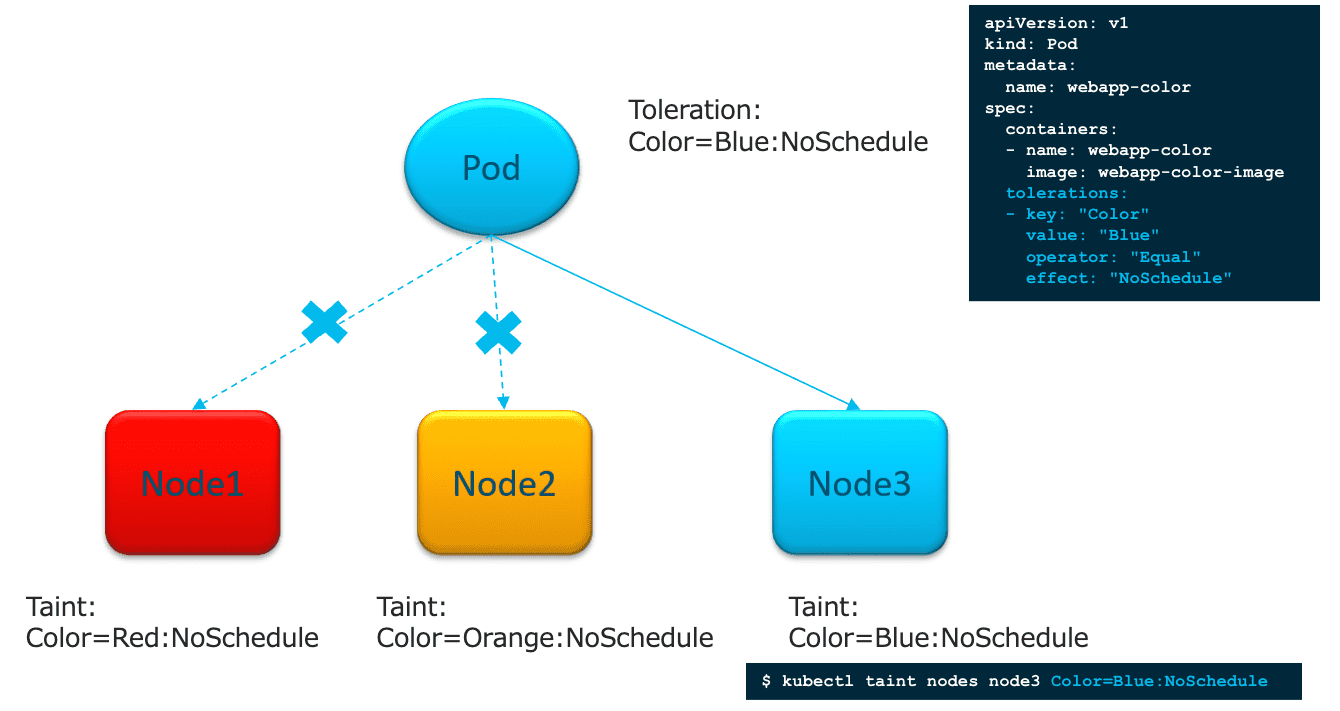
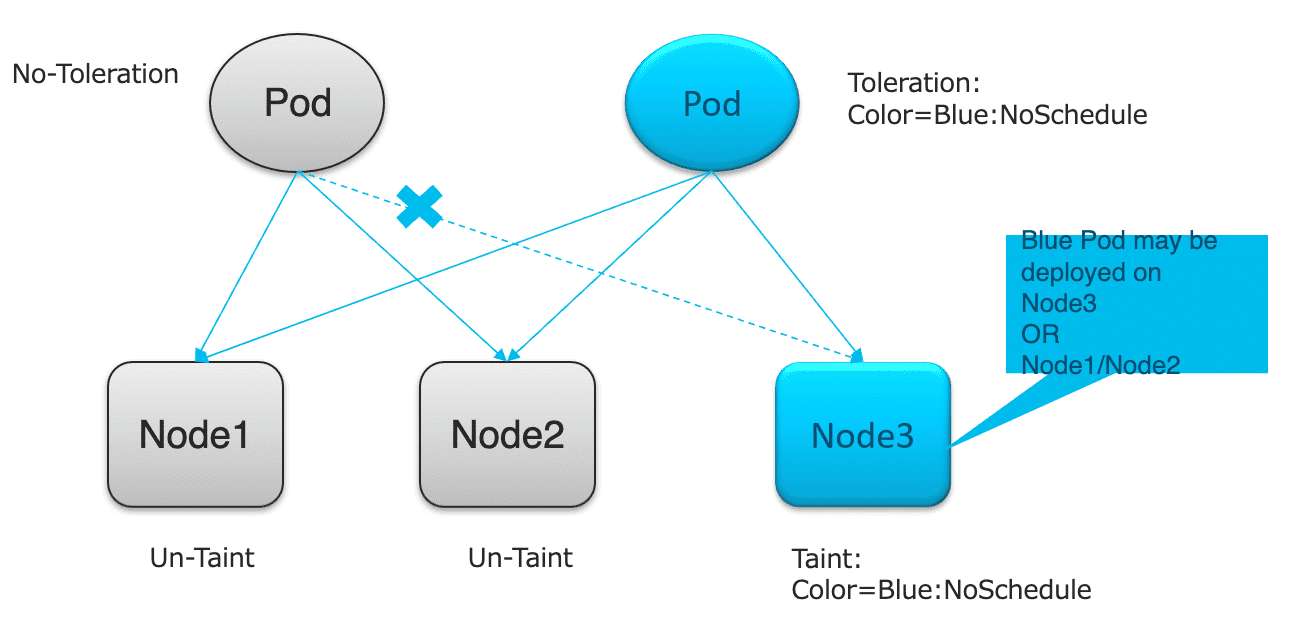
3 Taint/Toleration
通过 为 Node 设置 Taint 与 为 Pod 设置 Toleration 来实现调度策略。
3.1 Node Affinity
Taint/Toleration 适用于基于标签的简单选择,Node Affinity 适用于节点选择逻辑较为复杂的情况。
4 网络
4.1 基于网桥的三层网络模型(理论) 3
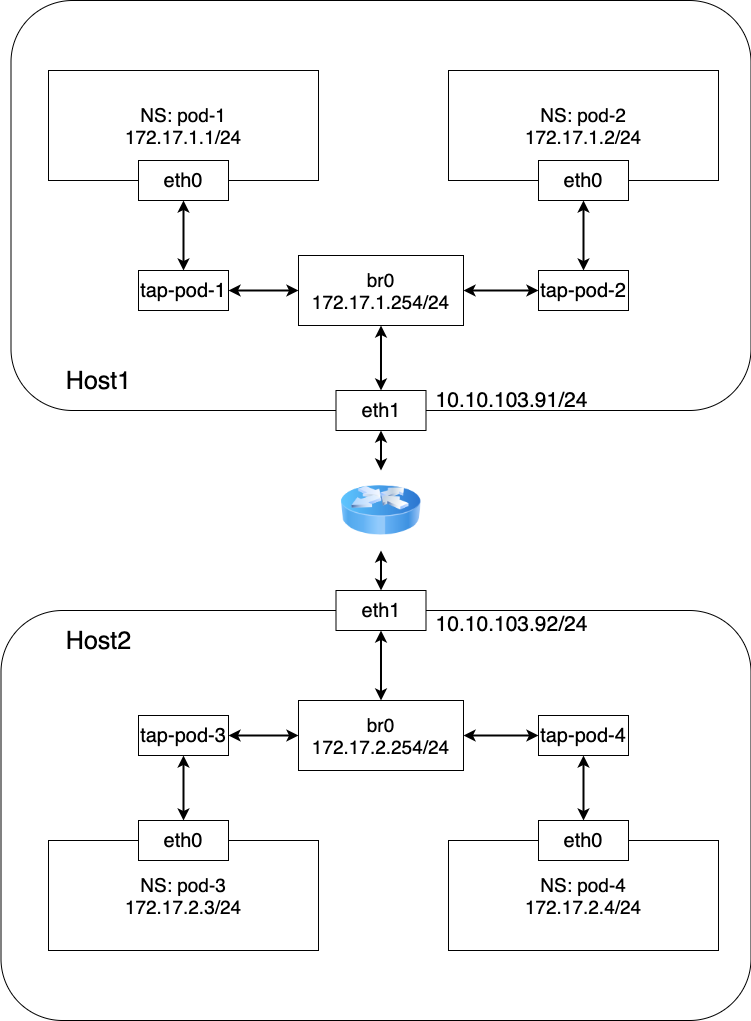
Figure 20: 仅使用三层网络构建的网络模型
此网络模型在不使用 Overlay 技术的情况下实现 Pod 间的通信,是最简单的网络模型。 结合 iptables 的 DNAT 功能实现 Pod 与 Service 之间的通信。
此模型中物理网卡作为网桥的 Slave 设备,因此节点之间只能通过二层设备互联,不能跨路由器,因此多使用在局域网中, 不能跨机房,跨区域大面积部署。
在 Host1 中需要设置路由:(Host2 同理)
echo 1 > /proc/sys/net/ipv4/ip_forward
ip route add 172.17.2.0/24 via 10.10.103.92 dev eth0
ip route add 172.17.1.0/24 dev docker0
在 Pod-1/Pod-2 中 也需要做配置:(Pod-3/Pod-4 同理)
ip route add 10.10.103.91 dev eth0
ip route add default via 10.10.103.91 dev eth0
4.2 CNI
CNI 是一个用于构建虚拟化网络的插件,它有两方面的含义:① 指定操作规范 (Specifications) ;② 提供工具命令 (位于 /opt/cni/bin/ 目录下)
创建容器网络的简单示例
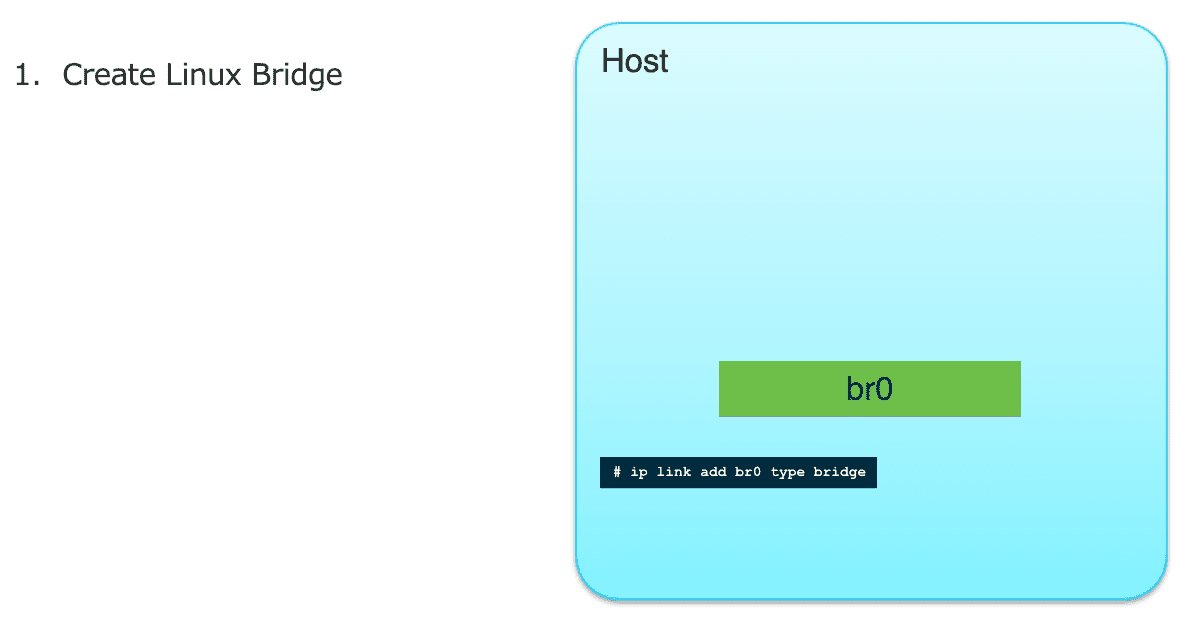
Figure 21: 创建网桥
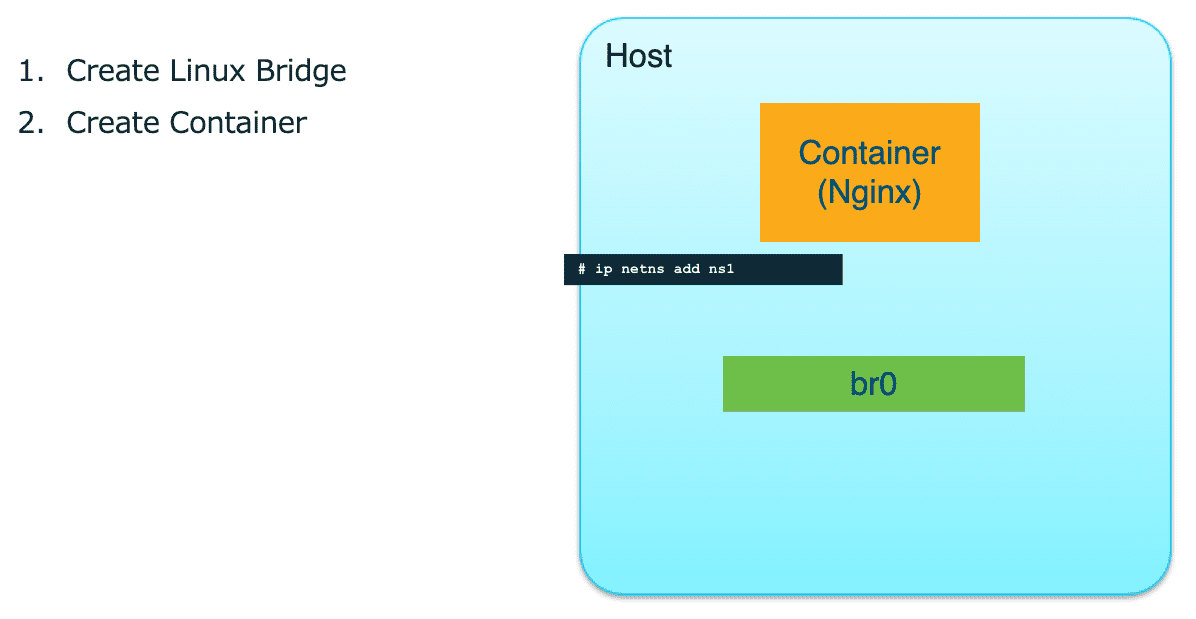
Figure 22: 创建 Network Namespace
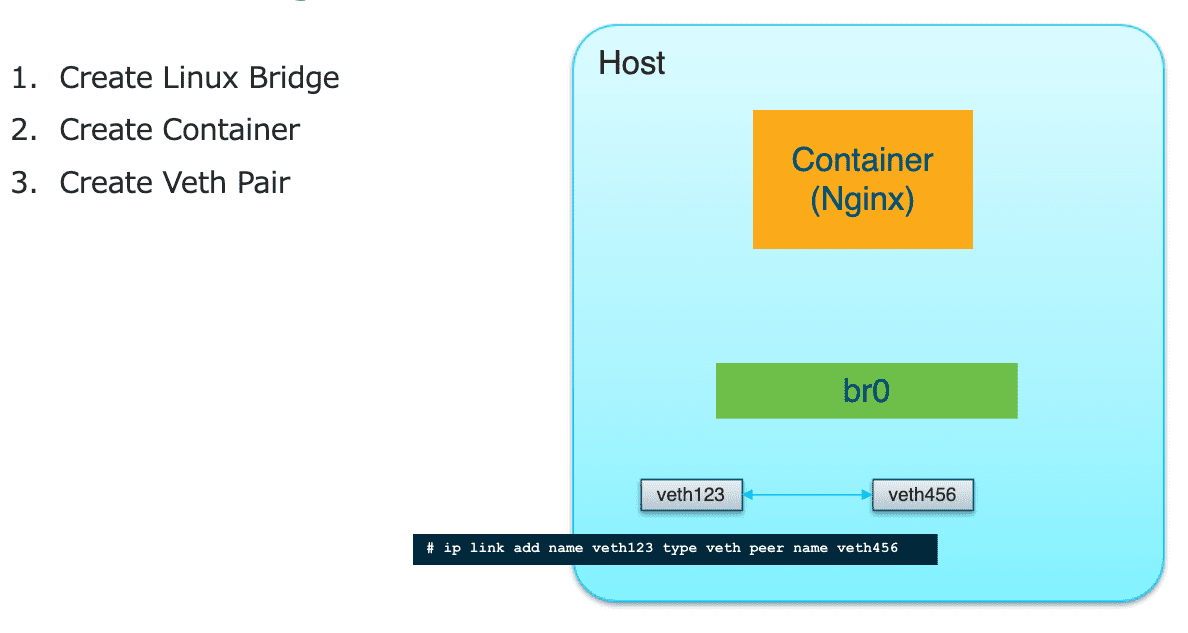
Figure 23: 创建 VETH PAIR
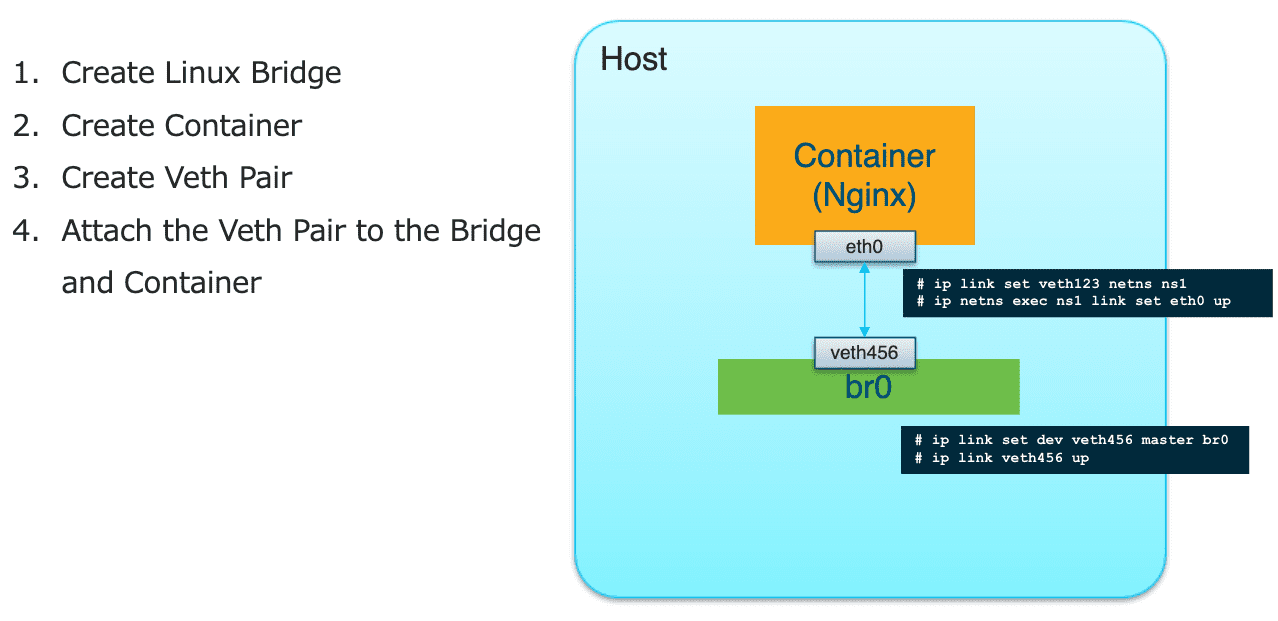
Figure 24: 将 VETH PAIR 连接到 NS 和 Bridge
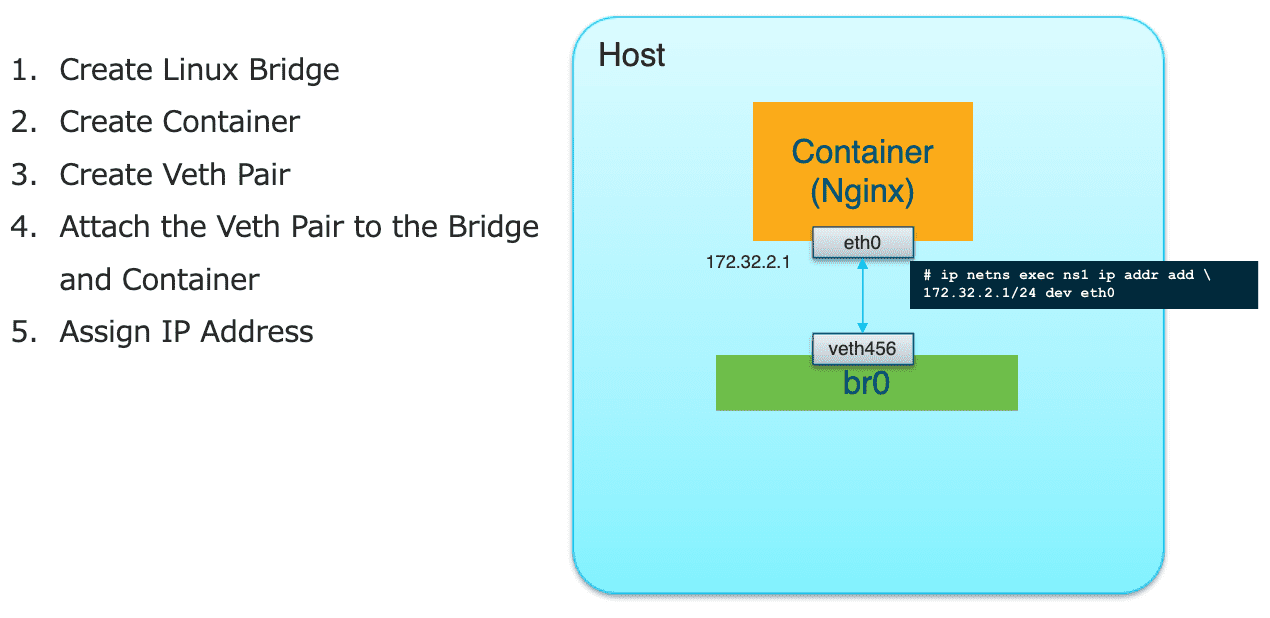
Figure 25: 为 NS 中的接口添加地址

Figure 26: 在根 NS 中配置 iptables (DNAT)
以下面的脚本为例,CNI 就是制定了 ADD/DELETE/CHECK/VERSION 这些动作(接口) ,而 Calico, Flannel 等则负责具体的实现,就像上述的示例。
#! /bin/bash
case $1 in
    "ADD")                      # Add a network to a container
        ip l add br0 type bridge
        ip netns add ns1
        ip l add name veth123 type veth peer name veth456
        ip netns exec ns1 link set eth0 up
        ip l set dev veth456 master br0
        ip l veth456 up
        ip netns exec ns1 ip a add 172.32.2.1/24 dev eth0
        iptables -t nat -A DOCKER -j DNAT --dport 8080 --to-destination 172.32.2.1:80
        ;;
    "DELETE")                   # Remove a network from a container
        ;;
    "CHECK")                    # Get network information for a container
        ;;
    "VERSION")                  # CNI version
        ;;
done
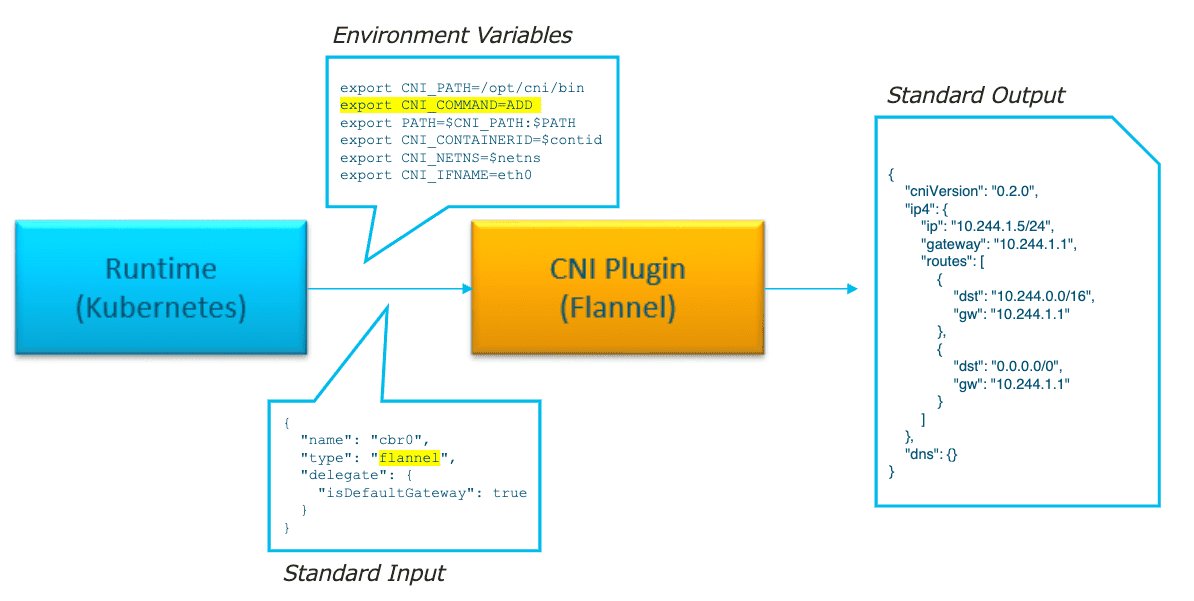
Figure 27: CNI plugin 负责生成对容器网络的描述
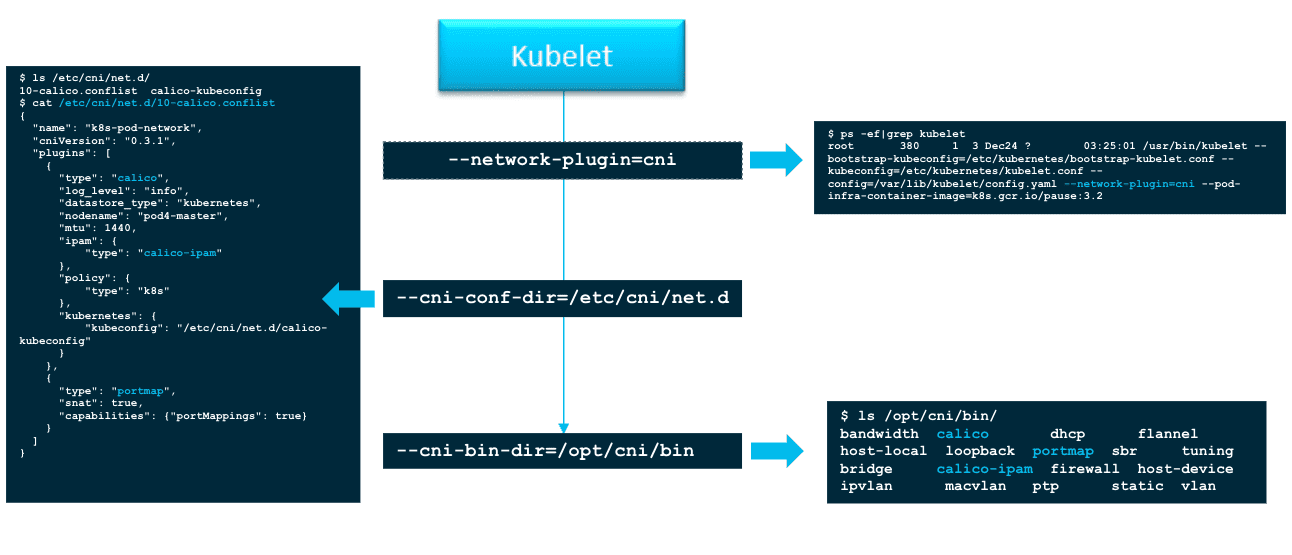
Figure 28: kubelet 负责 CNI plugin 的加载
4.2.1 Flannel 4
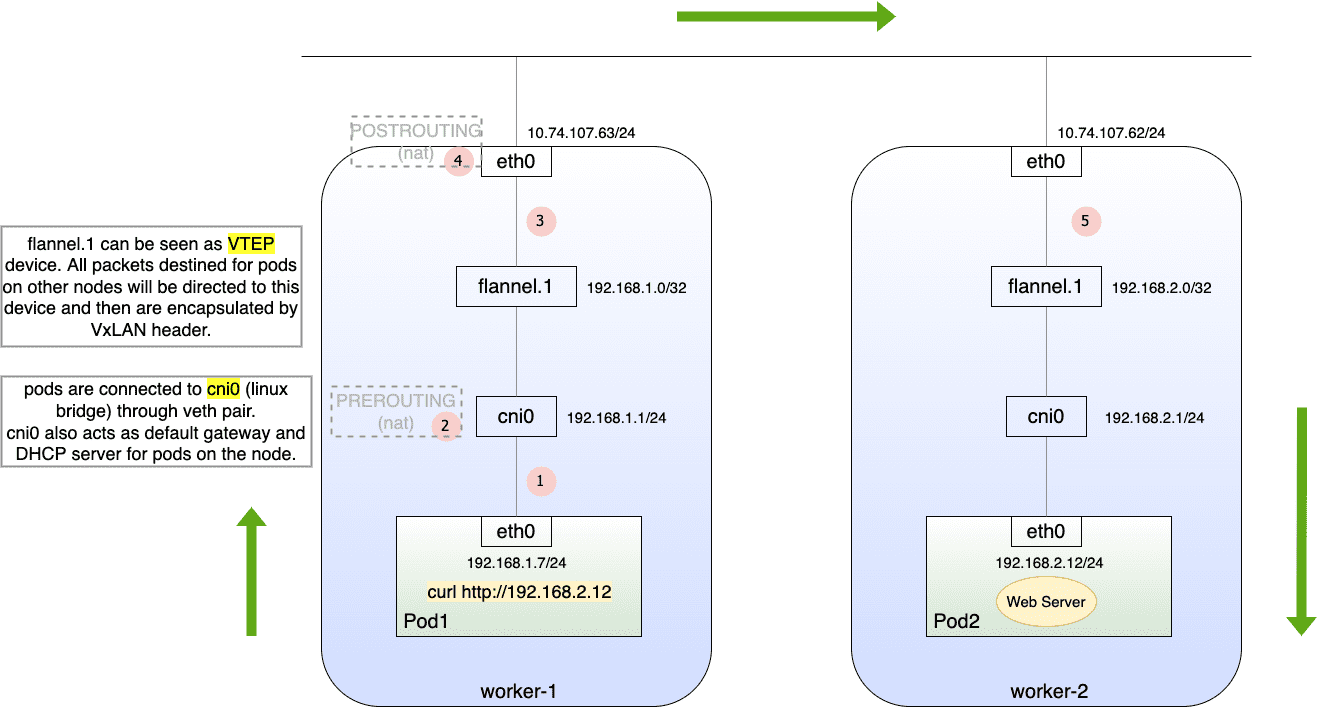
Figure 29: Flannel 网络示意图
①
(pod1) # ip a
1: lo: <LOOPBACK,UP,LOWER_UP> mtu 65536 qdisc noqueue qlen 1000
    link/loopback 00:00:00:00:00:00 brd 00:00:00:00:00:00
    inet 127.0.0.1/8 scope host lo
       valid_lft forever preferred_lft forever
3: eth0@if11: <BROADCAST,MULTICAST,UP,LOWER_UP,M-DOWN> mtu 1450 qdisc noqueue
    link/ether 6a:97:3e:20:55:e6 brd ff:ff:ff:ff:ff:ff
    inet 192.168.1.7/24 brd 192.168.1.255 scope global eth0
       valid_lft forever preferred_lft forever
(pod1) # ip r
default via 192.168.1.1 dev eth0
192.168.0.0/16 via 192.168.1.1 dev eth0
192.168.1.0/24 dev eth0 scope link  src 192.168.1.7
#################################################################
(worker-1) $ ip a
3: docker0: <NO-CARRIER,BROADCAST,MULTICAST,UP> mtu 1500 qdisc noqueue state DOWN group default
    link/ether 02:42:de:f0:74:4f brd ff:ff:ff:ff:ff:ff
    inet 172.17.0.1/16 brd 172.17.255.255 scope global docker0
       valid_lft forever preferred_lft forever
4: flannel.1: <BROADCAST,MULTICAST,UP,LOWER_UP> mtu 1450 qdisc noqueue state UNKNOWN group default
    link/ether 7e:4f:1b:41:c7:7a brd ff:ff:ff:ff:ff:ff
    inet 192.168.1.0/32 scope global flannel.1
       valid_lft forever preferred_lft forever
    inet6 fe80::7c4f:1bff:fe41:c77a/64 scope link
       valid_lft forever preferred_lft forever
5: cni0: <BROADCAST,MULTICAST,UP,LOWER_UP> mtu 1450 qdisc noqueue state UP group default qlen 1000
    link/ether e2:b0:c7:1e:8e:7a brd ff:ff:ff:ff:ff:ff
    inet 192.168.1.1/24 brd 192.168.1.255 scope global cni0
       valid_lft forever preferred_lft forever
    inet6 fe80::e0b0:c7ff:fe1e:8e7a/64 scope link
       valid_lft forever preferred_lft forever
11: veth6b3caf45@if3: <BROADCAST,MULTICAST,UP,LOWER_UP> mtu 1450 qdisc noqueue master cni0 state UP group default
    link/ether de:9c:43:da:8b:ce brd ff:ff:ff:ff:ff:ff link-netnsid 3
    inet6 fe80::dc9c:43ff:feda:8bce/64 scope link
       valid_lft forever preferred_lft forever
(worker-1)$ brctl show
bridge name     bridge id               STP enabled     interfaces
cni0            8000.e2b0c71e8e7a       no              veth100d66d7
                                                        veth6b3caf45
                                                        vetheed12777
docker0         8000.0242def0744f       no
② cni0 收到 IP 包,因为 network namespace 发生了切换,即 root namespace 收到一个数据包,如果 pod1 访问的是 service url (cluster ip) ,则在这一步,会根据 iptables NAT 表 PREROUTING 链,修改目标 ip/port 。因此无论是访问 service 还是直接访问 pod ,目标 ip/port 指向的永远是 endpoint 。
由于 endpoint 为 192.168.2.12:80 ,根据路由表,数据将被交给 flannel.1 设备:
(worker-1)$ ip r
default via 10.74.107.154 dev eth0 proto static
10.74.107.0/24 dev eth0 proto kernel scope link src 10.74.107.63
172.17.0.0/16 dev docker0 proto kernel scope link src 172.17.0.1 linkdown
192.168.0.0/24 via 192.168.0.0 dev flannel.1 onlink
192.168.1.0/24 dev cni0 proto kernel scope link src 192.168.1.1
192.168.2.0/24 via 192.168.2.0 dev flannel.1 onlink
③ flannel.1 实际上是 vxlan 设备,驱动程序会依据 etcd 中记录的转发规则确定 vxlan header ,即目标 ip 为 worker-2 。
④ 当数据包即将从物理网卡发出时,会根据 iptables nat 表的 POSTROUTING 链执行 SNAT 转换。
在 worker-2 上进行抓包: PCAP 💾
Frame 361: 192 bytes on wire (1536 bits), 192 bytes captured (1536 bits)
Ethernet II, Src: VMware_82:51:0c (00:50:56:82:51:0c), Dst: VMware_82:a9:01 (00:50:56:82:a9:01)
Internet Protocol Version 4, Src: 10.74.107.63, Dst: 10.74.107.62  外层 IP
User Datagram Protocol, Src Port: 35115, Dst Port: 8472
Virtual eXtensible Local Area Network
Ethernet II, Src: 7e:4f:1b:41:c7:7a (7e:4f:1b:41:c7:7a), Dst: a6:0d:d2:cd:65:14 (a6:0d:d2:cd:65:14)
Internet Protocol Version 4, Src: 192.168.1.7, Dst: 192.168.2.12  内层 IP
Transmission Control Protocol, Src Port: 50058, Dst Port: 80, Seq: 1, Ack: 1, Len: 76
Hypertext Transfer Protocol
    GET / HTTP/1.1\r\n
    Host: 192.168.2.12\r\n
    User-Agent: curl/7.64.1\r\n
    Accept: */*\r\n
    \r\n
    [Full request URI: http://192.168.2.12/]
    [HTTP request 1/1]
    [Response in frame: 363]
⑤ 当数据包到达 worker-2 后,因为有 kernel module(flanneld) 监听 udp:8472 端口,vxlan 报文被解封装,再根据路由表可知,数据包需要转交给 cni0 ,最终到达 pod2 。
root@worker-2(10.74.107.62):/ $ ps -ef | grep [f]lannel
root       16763   16743  0 11:41 ?        00:00:07 /opt/bin/flanneld --ip-masq --kube-subnet-mgr
root@worker-2(10.74.107.62):/ ss -ulpne
State    Recv-Q   Send-Q      Local Address:Port       Peer Address:Port   Process
UNCONN   0        0           127.0.0.53%lo:53              0.0.0.0:*       users:(("systemd-resolve",pid=629,fd=12)) uid:101 ino:22660 sk:8b <->
UNCONN   0        0                 0.0.0.0:8472            0.0.0.0:*       ino:184269 sk:8c <->
root@worker-2(10.74.107.62):/ ip r
default via 10.74.107.154 dev eth0 proto static
10.74.107.0/24 dev eth0 proto kernel scope link src 10.74.107.62
172.17.0.0/16 dev docker0 proto kernel scope link src 172.17.0.1 linkdown
192.168.0.0/24 via 192.168.0.0 dev flannel.1 onlink
192.168.1.0/24 via 192.168.1.0 dev flannel.1 onlink
192.168.2.0/24 dev cni0 proto kernel scope link src 192.168.2.1
4.2.2 Calico
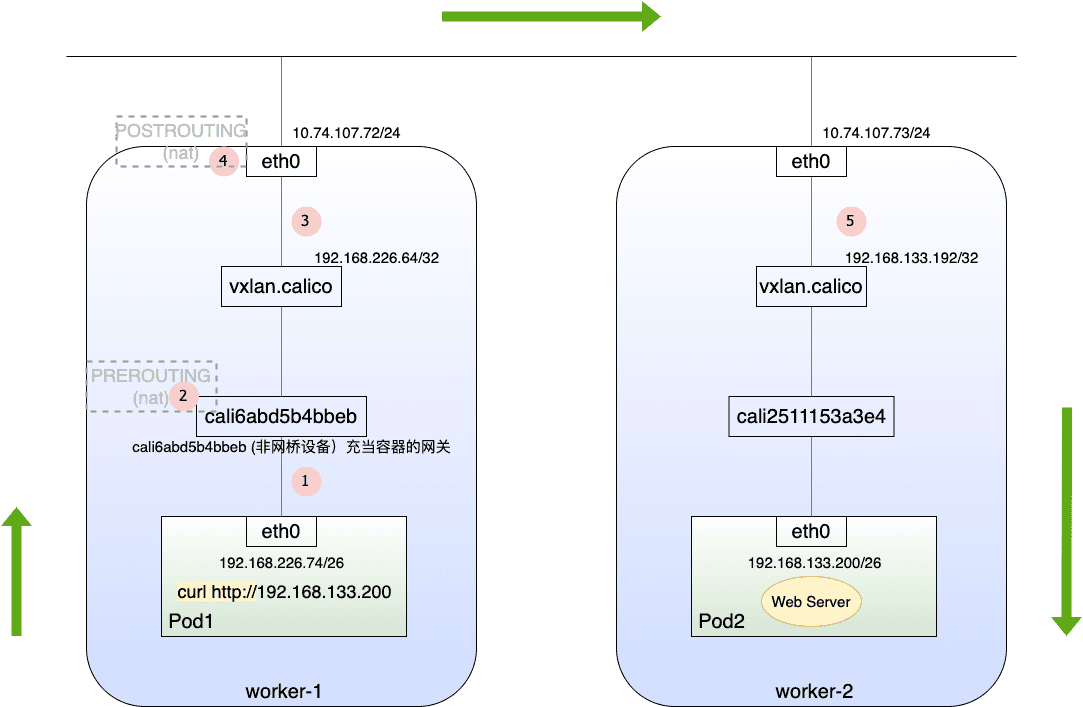
Figure 30: Calico 网络示意
网络原理和 Flannel 基本类似,不同的是 calico 不使用网桥设备作为容器的网关,而是将网关直接指向 veth pair 。
①
(pod1)/ # ip a
1: lo: <LOOPBACK,UP,LOWER_UP> mtu 65536 qdisc noqueue qlen 1000
    link/loopback 00:00:00:00:00:00 brd 00:00:00:00:00:00
    inet 127.0.0.1/8 scope host lo
       valid_lft forever preferred_lft forever
3: eth0@if16:  mtu 1450 qdisc noqueue
    link/ether 7a:1d:70:95:60:29 brd ff:ff:ff:ff:ff:ff
    inet 192.168.226.74/32 scope global eth0
       valid_lft forever preferred_lft forever
(pod1)/ # ip r
default via 169.254.1.1 dev eth0  网关指向一个虚拟的本地链路地址
169.254.1.1 dev eth0 scope link
(pod1)/ # ip n
169.254.1.1 dev eth0 lladdr ee:ee:ee:ee:ee:ee used 0/0/0 probes 1 STALE  就是 veth 对端接口的物理地址
##############
(worker-1)$> ip l
1: lo: <LOOPBACK,UP,LOWER_UP> mtu 65536 qdisc noqueue state UNKNOWN mode DEFAULT group default qlen 1000
    link/loopback 00:00:00:00:00:00 brd 00:00:00:00:00:00
2: eth0: <BROADCAST,MULTICAST,UP,LOWER_UP> mtu 1500 qdisc mq state UP mode DEFAULT group default qlen 1000
    link/ether 00:50:56:82:6b:75 brd ff:ff:ff:ff:ff:ff
3: docker0: <hNO-CARRIER,BROADCAST,MULTICAST,UP> mtu 1500 qdisc noqueue state DOWN mode DEFAULT group default
    link/ether 02:42:20:9d:01:22 brd ff:ff:ff:ff:ff:ff
6: cali9558f23398a@if3: <BROADCAST,MULTICAST,UP,LOWER_UP> mtu 1450 qdisc noqueue state UP mode DEFAULT group default
    link/ether ee:ee:ee:ee:ee:ee brd ff:ff:ff:ff:ff:ff link-netnsid 0
7: vxlan.calico: <BROADCAST,MULTICAST,UP,LOWER_UP> mtu 1450 qdisc noqueue state UNKNOWN mode DEFAULT group default
    link/ether 66:93:7f:54:d5:53 brd ff:ff:ff:ff:ff:ff
15: cali5d30ef99766@if3: <BROADCAST,MULTICAST,UP,LOWER_UP> mtu 1450 qdisc noqueue state UP mode DEFAULT group default
    link/ether ee:ee:ee:ee:ee:ee brd ff:ff:ff:ff:ff:ff link-netnsid 1
16: cali6abd5b4bbeb@if3: <BROADCAST,MULTICAST,UP,LOWER_UP> mtu 1450 qdisc noqueue state UP mode DEFAULT group default
    link/ether ee:ee:ee:ee:ee:ee brd ff:ff:ff:ff:ff:ff link-netnsid 2
(worker-1)$> ip r 路由信息由 BIRD/felix 负责维护
default via 10.74.107.154 dev eth0 proto static
10.74.107.0/24 dev eth0 proto kernel scope link src 10.74.107.72
172.17.0.0/16 dev docker0 proto kernel scope link src 172.17.0.1 linkdown
192.168.133.192/26 via 192.168.133.192 dev vxlan.calico onlink  去往位于 worker-2 上的 pod 的流量需经过 vxlan 设备进行封装
192.168.219.64/26 via 192.168.219.65 dev vxlan.calico onlink
blackhole 192.168.226.64/26 proto 80
192.168.226.65 dev cali9558f23398a scope link
192.168.226.73 dev cali5d30ef99766 scope link  去往位于本机上 pod 的流量,直接走 cali 接口即可
192.168.226.74 dev cali6abd5b4bbeb scope link
⑤ PCAP 💾
Frame 54: 195 bytes on wire (1560 bits), 195 bytes captured (1560 bits)
Ethernet II, Src: VMware_82:6b:75 (00:50:56:82:6b:75), Dst: VMware_82:2a:53 (00:50:56:82:2a:53)
Internet Protocol Version 4, Src: 10.74.107.72, Dst: 10.74.107.73
User Datagram Protocol, Src Port: 59709, Dst Port: 4789
Virtual eXtensible Local Area Network
Ethernet II, Src: 66:93:7f:54:d5:53 (66:93:7f:54:d5:53), Dst: 66:e2:6c:ca:0c:ad (66:e2:6c:ca:0c:ad)
Internet Protocol Version 4, Src: 192.168.226.74, Dst: 192.168.133.200
Transmission Control Protocol, Src Port: 37570, Dst Port: 80, Seq: 1, Ack: 1, Len: 79
Hypertext Transfer Protocol
    GET / HTTP/1.1\r\n
    Host: 192.168.133.200\r\n
    User-Agent: curl/7.64.1\r\n
    Accept: */*\r\n
    \r\n
    [Full request URI: http://192.168.133.200/]
    [HTTP request 1/1]
    [Response in frame: 56]
4.2.2.1 组件
每个节点都会运行 BGP ( bird 进程) ,节点上 pod 的网络信息通过 BGP 协议分发。
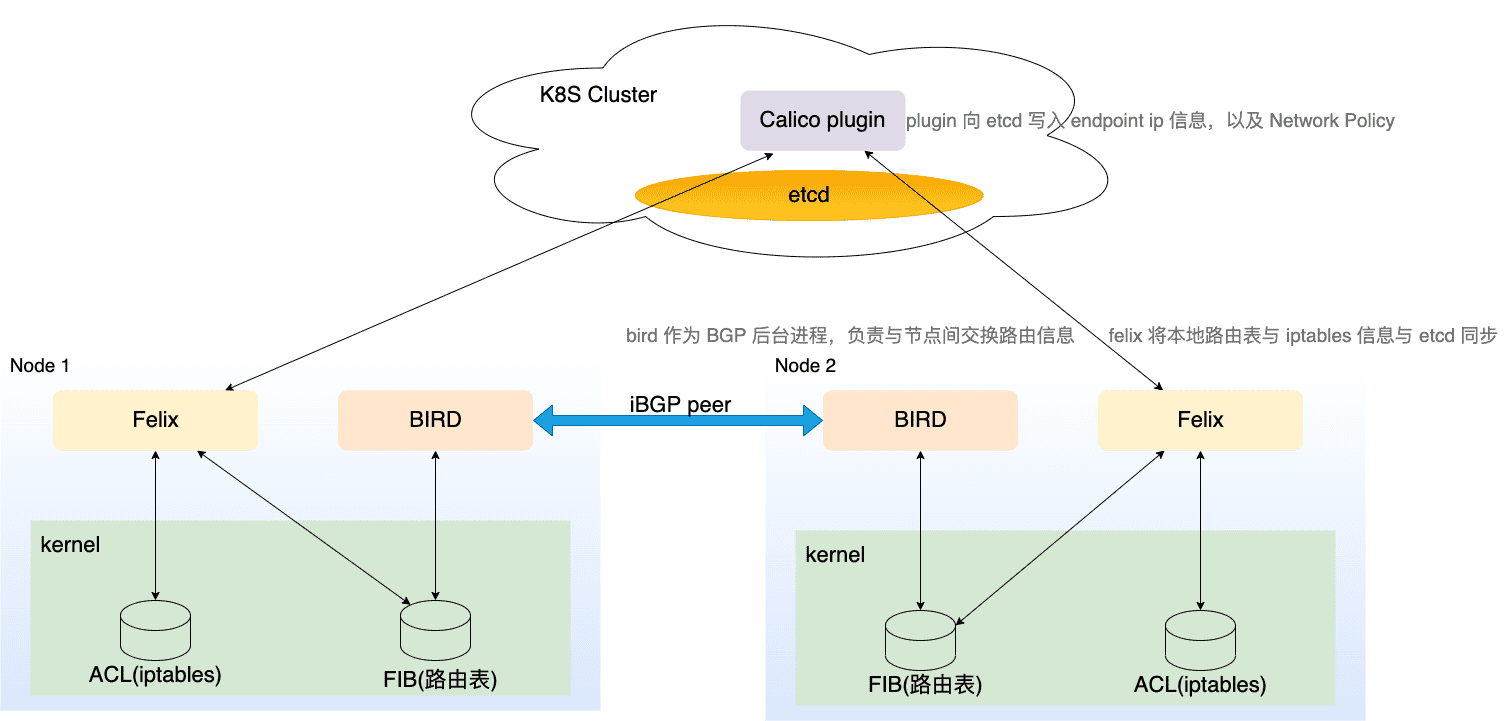
Figure 31: Calico 使用的几大组件
4.3 Network Policy 5
4.3.1 Deny all incoming traffic
apiVersion: networking.k8s.io/v1
kind: NetworkPolicy
metadata:
  name: deny-all-incoming
spec:
  podSelector: {}
  policyTypes:
  - Ingress
$> k describe networkpolicy deny-all-incoming
Name:         deny-all-incoming
Namespace:    default
Created on:   2022-05-16 18:33:57 +0800 CST
Labels:       <none>
Annotations:  <none>
Spec:
  PodSelector:     <none> (Allowing the specific traffic to all pods in this namespace)
  Allowing ingress traffic:
    <none> (Selected pods are isolated for ingress connectivity)
  Not affecting egress traffic
  Policy Types: Ingress
4.3.2 Deny all outgoing traffic
apiVersion: networking.k8s.io/v1
kind: NetworkPolicy
metadata:
  name: deny-all-outgoing
spec:
  podSelector: {}
  policyTypes:
  - Egress
$ k describe networkpolicy deny-all-outgoing
Name:         deny-all-outgoing
Namespace:    default
Created on:   2022-05-16 18:33:57 +0800 CST
Labels:       <none>
Annotations:  <none>
Spec:
  PodSelector:     <none> (Allowing the specific traffic to all pods in this namespace)
  Not affecting ingress traffic
  Allowing egress traffic:
    <none> (Selected pods are isolated for egress connectivity)
  Policy Types: Egress
4.3.3 Allow all incoming traffic
apiVersion: networking.k8s.io/v1
kind: NetworkPolicy
metadata:
  name: allow-all-incoming
spec:
  podSelector: {}
  ingress:
  - {}
  policyTypes:
  - Ingress
$ k describe networkpolicy allow-all-incoming
Name:         allow-all-incoming
Namespace:    default
Created on:   2022-05-16 18:33:57 +0800 CST
Labels:       <none>
Annotations:  <none>
Spec:
  PodSelector:     <none> (Allowing the specific traffic to all pods in this namespace)
  Allowing ingress traffic:
    To Port: <any> (traffic allowed to all ports)
    From: <any> (traffic not restricted by source)
  Not affecting egress traffic
  Policy Types: Ingress
4.3.4 Allow all outgoing traffic
apiVersion: networking.k8s.io/v1
kind: NetworkPolicy
metadata:
  name: allow-all-outgoing
spec:
  podSelector: {}
  egress:
  - {}
  policyTypes:
  - Egress
$ k describe networkpolicy allow-all-outgoing
Name:         allow-all-outgoing
Namespace:    default
Created on:   2022-05-16 17:55:21 +0800 CST
Labels:       <none>
Annotations:  <none>
Spec:
  PodSelector:     <none> (Allowing the specific traffic to all pods in this namespace)
  Not affecting ingress traffic
  Allowing egress traffic:
    To Port: <any> (traffic allowed to all ports)
    To: <any> (traffic not restricted by destination)
  Policy Types: Egress
5 Service Account
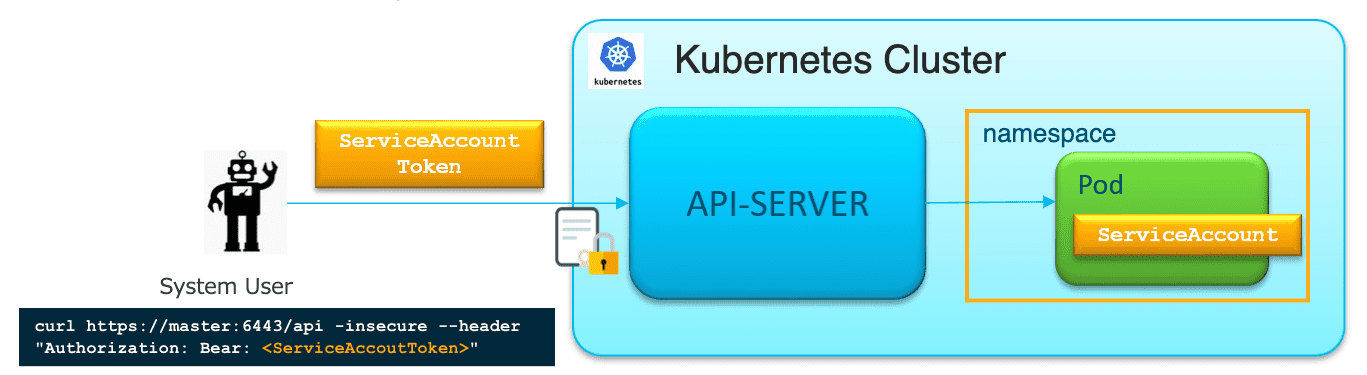
Figure 32: 基于 Token 的 SA
- 每个 Namespace 下都有一个默认的 SA ,在创建 NS 时会自动创建
- 默认情况下,SA 没有任何权限,通常需要手动授权【除非集群中没有 RBAC 插件,此时 SA 具有任何权限】
- Pod 的 SA 必须在 Pod 创建时设置,后续无法被修改
5.1 示例
5.1.1 允许访问 NS 下某些资源
资源清单
$> k exec -it test-namespace-view-sa -c main -- sh
/ # curl -s -D -  localhost:8001/api/v1/namespaces/default/pods -o nul
HTTP/1.1 200 OK
Audit-Id: b975720a-3bbf-4ce4-a2c1-deeadedb549d
Cache-Control: no-cache, private
Content-Type: application/json
Date: Mon, 16 May 2022 08:53:49 GMT
X-Kubernetes-Pf-Flowschema-Uid: 03dfc3e7-af25-4320-b6e6-fd653c811b78
X-Kubernetes-Pf-Prioritylevel-Uid: b704a131-e510-4db4-97a5-2241ba7d48c3
Transfer-Encoding: chunked
/ # curl -s -D -  localhost:8001/api/v1/namespaces/default/services -o nul
HTTP/1.1 403 Forbidden
Audit-Id: 5ba79ae8-d134-405c-b47c-b8238db4eb4a
Cache-Control: no-cache, private
Content-Length: 345
Content-Type: application/json
Date: Mon, 16 May 2022 08:53:57 GMT
X-Content-Type-Options: nosniff
X-Kubernetes-Pf-Flowschema-Uid: 03dfc3e7-af25-4320-b6e6-fd653c811b78
X-Kubernetes-Pf-Prioritylevel-Uid: b704a131-e510-4db4-97a5-2241ba7d48c3
/ #
5.1.2 允许访问 NS 下所有资源
资源清单
$ k exec -it test-namespace-view-sa -c main -- sh
/ # curl -s -D -  localhost:8001/api/v1/namespaces/default/pods -o nul
HTTP/1.1 200 OK
Audit-Id: 00e19919-bee1-4ef8-a630-6617846a0cb4
Cache-Control: no-cache, private
Content-Type: application/json
Date: Mon, 16 May 2022 08:57:57 GMT
X-Kubernetes-Pf-Flowschema-Uid: 03dfc3e7-af25-4320-b6e6-fd653c811b78
X-Kubernetes-Pf-Prioritylevel-Uid: b704a131-e510-4db4-97a5-2241ba7d48c3
Transfer-Encoding: chunked
/ # curl -s -D -  localhost:8001/api/v1/namespaces/default/services -o nul
HTTP/1.1 200 OK
Audit-Id: ffe4ea4e-d512-4ea0-ba3a-8ba3bd51b3ef
Cache-Control: no-cache, private
Content-Length: 2058
Content-Type: application/json
Date: Mon, 16 May 2022 08:58:03 GMT
X-Kubernetes-Pf-Flowschema-Uid: 03dfc3e7-af25-4320-b6e6-fd653c811b78
X-Kubernetes-Pf-Prioritylevel-Uid: b704a131-e510-4db4-97a5-2241ba7d48c3
5.1.3 赋予 SA 最高权限
资源清单
 $ k exec -it test-admin-sa -c main -- sh
/ # curl -s -D - localhost:8001/api/v1/nodes -o nul
HTTP/1.1 200 OK
Audit-Id: 98bc3732-55de-4be3-8b69-f1c763e2b4a1
Cache-Control: no-cache, private
Content-Type: application/json
Date: Mon, 16 May 2022 09:05:55 GMT
X-Kubernetes-Pf-Flowschema-Uid: 03dfc3e7-af25-4320-b6e6-fd653c811b78
X-Kubernetes-Pf-Prioritylevel-Uid: b704a131-e510-4db4-97a5-2241ba7d48c3
Transfer-Encoding: chunked
6 Role&RoleBinding
Role 可以定义访问:
- 特定 namespace 下的资源
ClusterRole 可以定义访问:
- 集群级别的资源,如 node
- 非资源型 endpoints ,如
/healthz - 所有 namespace 下的资源
Role/ClusterRole 只是定义可以访问的 资源范围 ,还需要参考实际使用的 RoleBinding/ClusterRoleBinding 。
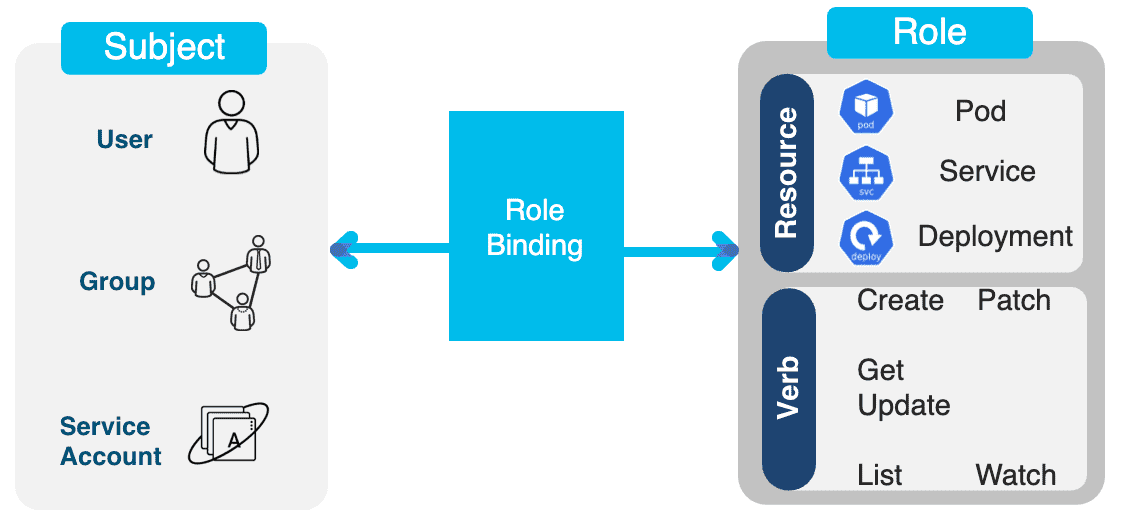
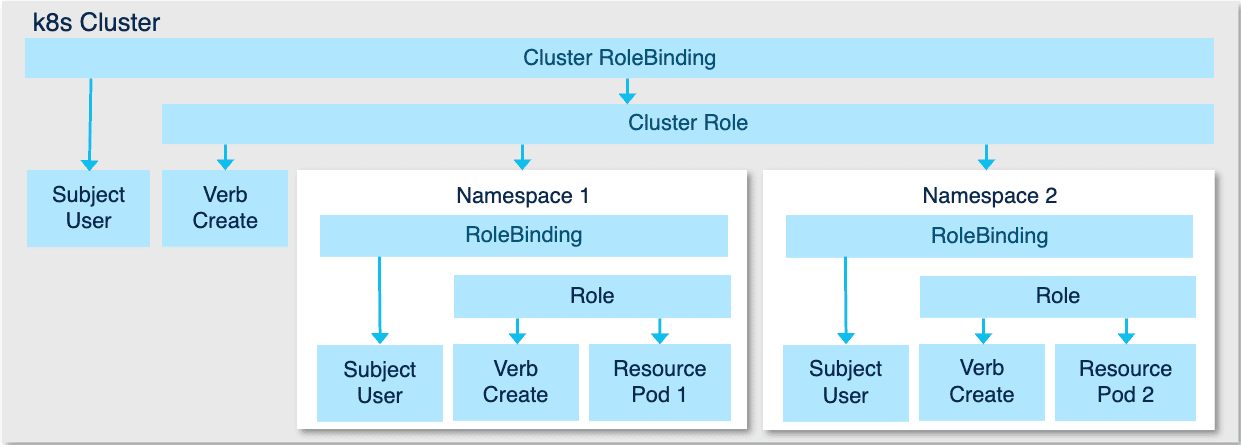
Figure 34: per namespace vs per cluster
6.1 仅当前命名空间内【Role/RoleBinding】【ClusterRole/RoleBinding】
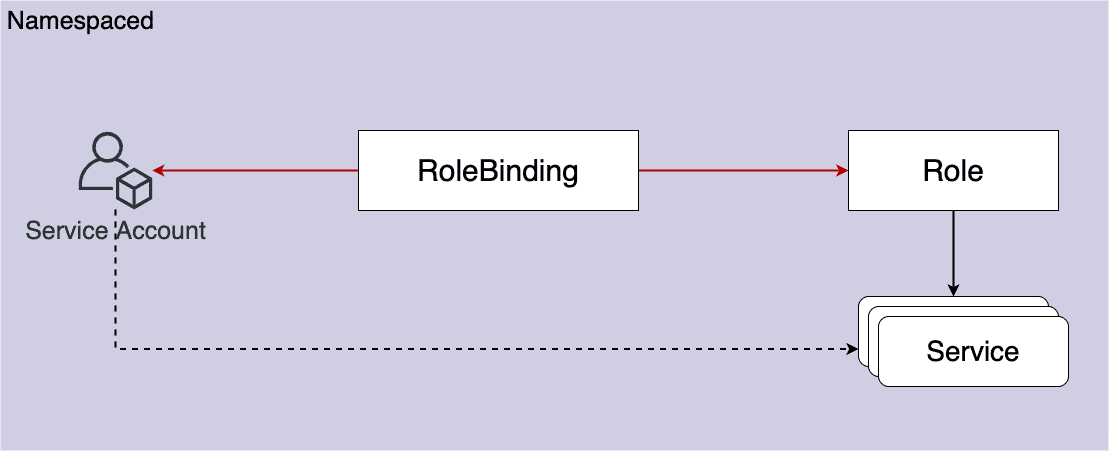
Figure 35: Role + RoleBinding
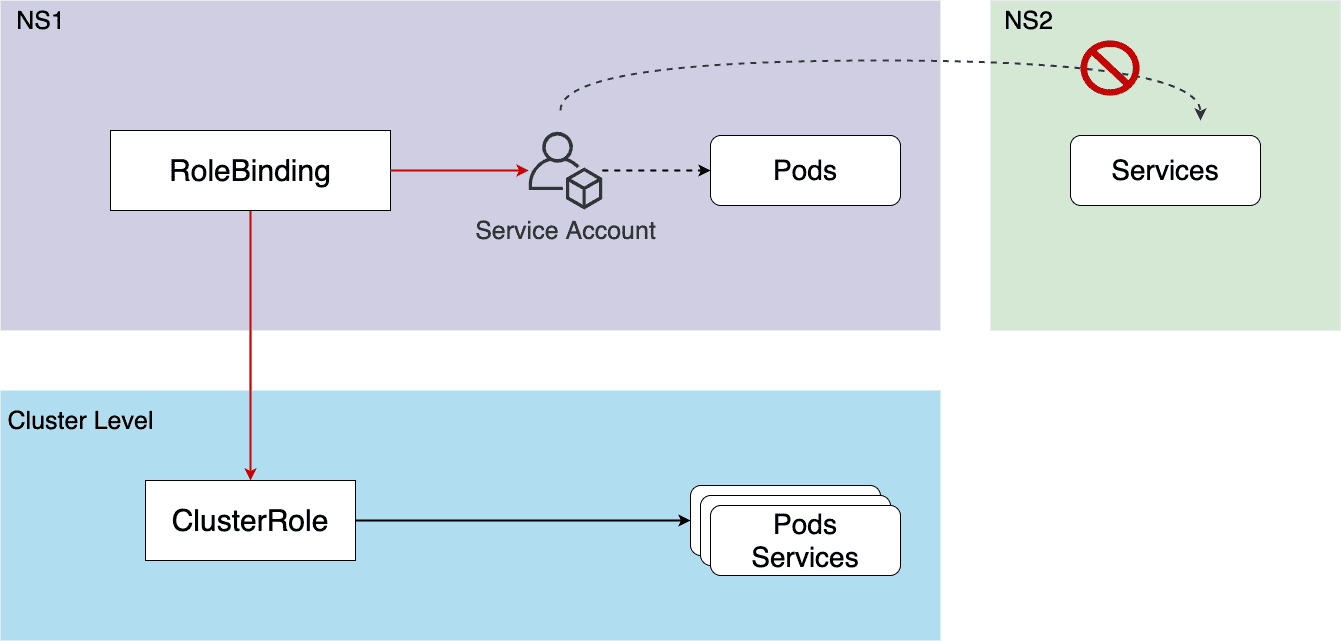
Figure 36: ClusterRole + RoleBinding
6.2 允许访问所有命名空间【ClusterRole/ClusterRoleBinding】

Figure 37: ClusterRole + ClusterRoleBinding
6.3 允许访问集群资源【ClusterRole/ClusterRoleBinding】
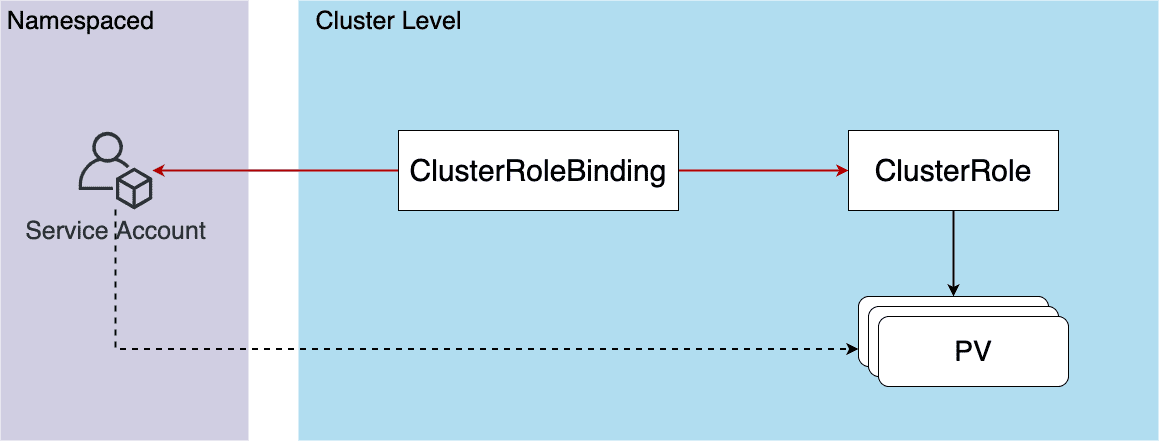
Figure 38: ClusterRole + ClusterRoleBinding
7 Tips
7.1 安装 master/worker
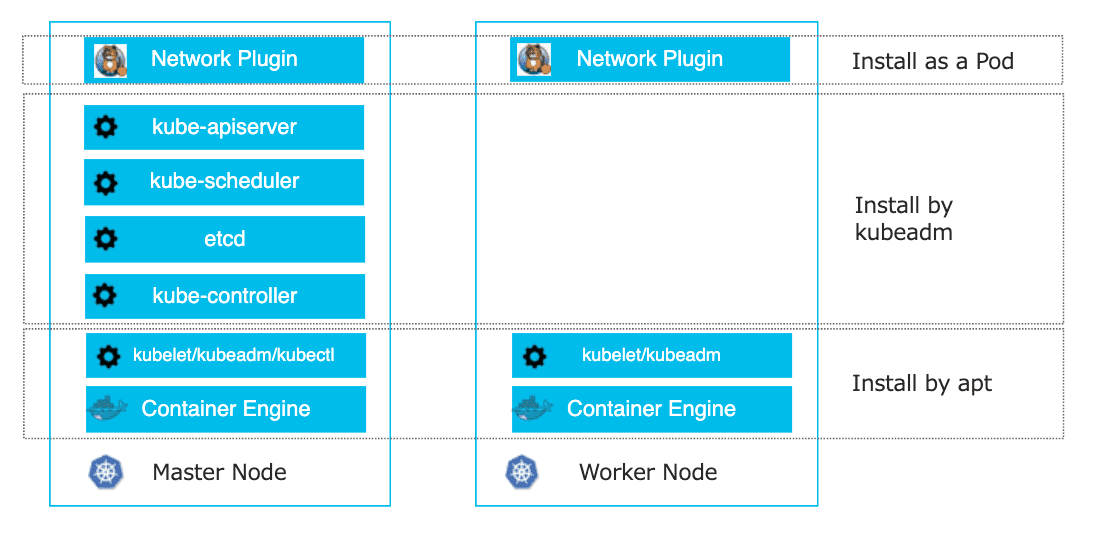
Figure 39: 需要安装的组件
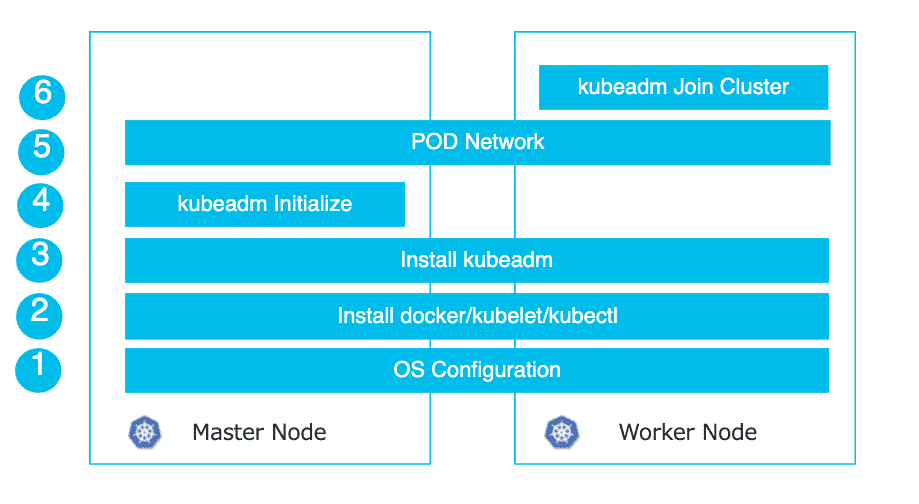
Figure 40: 安装步骤
$ corgi_configure k8s-bootstrap-master --help
Usage: corgi_configure k8s-bootstrap-master [OPTIONS]

Options:
  --kubernetes-version TEXT
  --pod-network TEXT
  --helm-version TEXT
  --metrics-server-version TEXT
  --dry
  --help                         Show this message and exit.
$ corgi_configure k8s-bootstrap-worker --help
Usage: corgi_configure k8s-bootstrap-worker [OPTIONS]

Options:
  --kubernetes-version TEXT
  --ip TEXT                  Master node global IP address  [required]
  --dry
  --help                     Show this message and exit.
7.2 YAML 模板 6
7.2.1 Pod
$> k run my-busybox --image=busybox -o yaml --dry-run=client --command -- sh -c 'while true; do sleep 10; done'
apiVersion: v1
kind: Pod
metadata:
  creationTimestamp: null
  labels:
    run: my-busybox
  name: my-busybox
spec:
  containers:
  - command:
    - sh
    - -c
    - while true; do sleep 10; done
    image: busybox
    name: my-busybox
    resources: {}
  dnsPolicy: ClusterFirst
  restartPolicy: Always
status: {}
7.2.2 Deployment
k create deployment--image= --port= --replicas= -o yaml --dry-run=client # k create deployment kubia --image=ruanhao/kubia:v1 --port=80 --replicas=3 -o yaml --dry-run=client
7.2.3 DaemonSet
先创建 Deployment 模块,然后修改下。
k create deploy my-daemon-set --image=ruanhao/kubia:v1 --dry-run=client -o yaml
apiVersion: apps/v1 kind:DeploymentDaemonSet metadata: creationTimestamp: null labels: app: my-daemon-set name: my-daemon-set spec:replicas: 1selector: matchLabels: app: my-daemon-setstrategy: {}template: metadata: creationTimestamp: null labels: app: my-daemon-set spec: containers: - image: ruanhao/kubia:v1 name: kubia resources: {}status: {}
7.2.4 Service
k create service [clusterip|nodeport|externalname|loadbalancer]--tcp= : --dry-run=client -o yaml # k create service clusterip kubia-v1 --tcp=80:80 --dry-run=client -o yaml
7.2.5 Ingress
kubectl create ingress NAME --rule=host/path=service:port[,tls[=secret]] --dry-run=client -o yaml
# k create ingress kubia-v1 --rule=www1.finditnm.com/*=kubia-v1:80 -o yaml --dry-run=client --annotation=kubernetes.io/ingress.class=nginx
# k create ingress kubia-v1 --rule=/v1*=kubia-v1:80 -o yaml --dry-run=client --annotation=kubernetes.io/ingress.class=nginx --annotation=nginx.ingress.kubernetes.io/rewrite-target=/
# k create ingress kubia-v1 --rule='/kubia/v2(/|$)(.*)*'=kubia-v2:80 -o yaml --dry-run=client --annotation=kubernetes.io/ingress.class=nginx --annotation=nginx.ingress.kubernetes.io/rewrite-target='/$2'
7.2.6 Role,ClusterRole/RoleBinding,ClusterRoleBinding
# 在某个 namespace 中限定对 Pod 的访问操作
k create role pod-reader-role --verb=get,list,watch --resource=pods --namespace=dev
# 在所有 namespace 中,限定对 Pod 的访问操作
k create role pod-reader-role --verb=get,list,watch --resource=pods
# 限定 Resource name
k create role pod-reader-role --verb=get --resource=pods --resource-name=one-pod --resource-name=anothere-pod  --namespace=dev
# 限定 API Group
k create role only-rs-role --verb=get,list,watch --resource=replicasets.apps
# 将 Role 与用户关联
k create rolebinding bob-admin-binding --clusterrole=admin --user=bob --namespace=dev
# 将 Role 与 Service Account 关联
k create rolebinding myapp-view-binding --clusterrole=view --serviceaccount=dev:myapp --namespace=dev
# 赋予用户最高权限
k create clusterrolebinding root-cluster-admin-binding --clusterrole=cluster-admin --user=root
# 赋予 Service Account (位于 namespace dev 中) 集群级别权限
k create clusterrolebinding myapp-view-binding --clusterrole=view --serviceaccount=dev:myapp
7.3 查看资源版本信息
k api-resources
7.4 更新 join command
(master)$> kubeadm token create $( kubeadm token generate ) --print-join-command
7.5 删除 label
k label pods PodName LabelName-
7.6 创建 KUBECONFIG
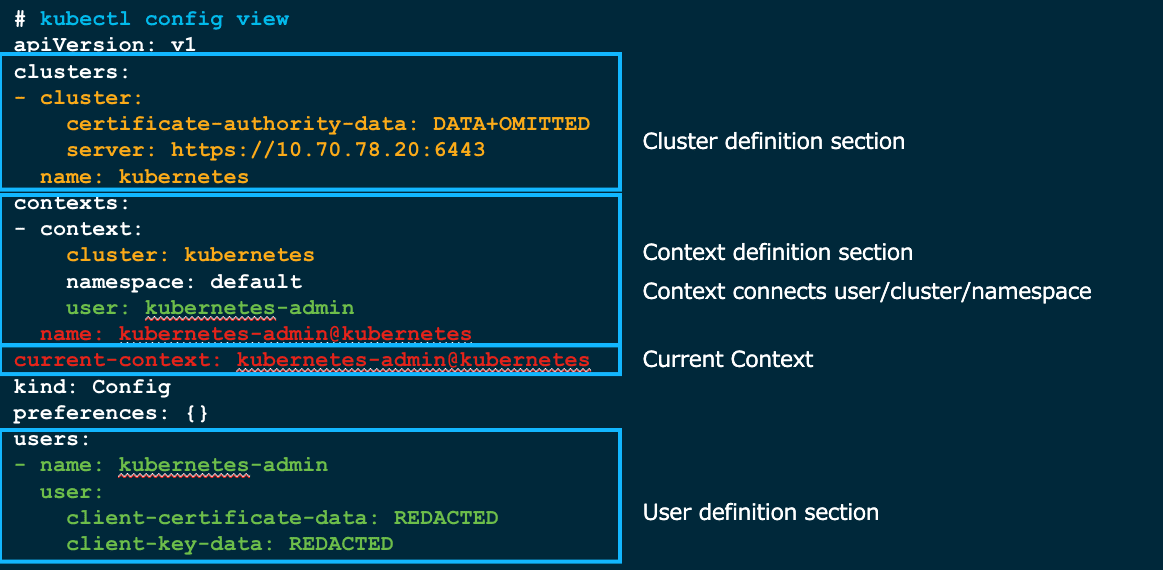
Figure 41: k config view (Context 将 User, NS 与 Cluster 绑定在一起)【可以通过 k config get-contexts 查看 Context 信息】
$ corgi_configure k8s-user-conf --help
Usage: corgi_configure k8s-user-conf [OPTIONS]

  Generate KUBECONFIG file which can be used to authenticate/authorize user
  with default cluster-admin role

Options:
  -s, --api-server TEXT      API Server address  [required]
  --api-server-port INTEGER  API Server port
  --pki-path TEXT            Directory where CA resides
  --cfssl-version TEXT       CFSSL version
  -u, --user TEXT            [required]
  -g, --group TEXT           [required]
  -ns, --namespace TEXT
  --dry
  --userspace                Namespace based or cluster based access level
  -e, --expiry-days INTEGER  Expiry days for certificate
  --help                     Show this message and exit.
7.7 创建用于测试的容器
k run cirror-$RANDOM --rm -it --image=cirros -- /bin/sh
7.8 Helm 简单使用
################ Install Redis #######################

helm repo add bitnami https://charts.bitnami.com/bitnami
helm pull bitnami/redis
tar xfvz redis-16.9.2.tgz
cd redis
sed -i '/storageClass: ""/ d' values.yaml   # in order to use dynamic pv
helm install -f values.yaml --namespace=default my-redis .
# if only modified values.yaml, can just:
# helm install my-redis bitnami/redis -f ./values.yaml

# BTW, show you how to get redis password:
# kubectl get secret --namespace default my-redis -o jsonpath="{.data.redis-password}" | base64 --decode
# kubectl exec my-redis-master-0 -it -- /bin/sh
# $ redis-cli -a **********
7.9 更新证书
################## Extend Certificates' expiry date by one year ########################

# kubeadm alpha certs renew all
[renew] Reading configuration from the cluster...
[renew] FYI: You can look at this config file with 'kubectl -n kube-system get cm kubeadm-config -oyaml'

certificate embedded in the kubeconfig file for the admin to use and for kubeadm itself renewed
certificate for serving the Kubernetes API renewed
certificate the apiserver uses to access etcd renewed
certificate for the API server to connect to kubelet renewed
certificate embedded in the kubeconfig file for the controller manager to use renewed
certificate for liveness probes to healthcheck etcd renewed
certificate for etcd nodes to communicate with each other renewed
certificate for serving etcd renewed
certificate for the front proxy client renewed
certificate embedded in the kubeconfig file for the scheduler manager to use renewed
7.10 查看 etcd
> cat /etc/kubernetes/manifests/etcd.yaml
apiVersion: v1
kind: Pod
metadata:
  annotations:
    kubeadm.kubernetes.io/etcd.advertise-client-urls: https://10.74.107.43:2379
  creationTimestamp: null
  labels:
    component: etcd
    tier: control-plane
  name: etcd
  namespace: kube-system
spec:
  containers:
  - command:
    - etcd
    - --advertise-client-urls=https://10.74.107.43:2379
    - --cert-file=/etc/kubernetes/pki/etcd/server.crt
    - --client-cert-auth=true
    - --data-dir=/var/lib/etcd
    - --initial-advertise-peer-urls=https://10.74.107.43:2380
    - --initial-cluster=master=https://10.74.107.43:2380
    - --key-file=/etc/kubernetes/pki/etcd/server.key
    - --listen-client-urls=https://127.0.0.1:2379,https://10.74.107.43:2379
    - --listen-metrics-urls=http://127.0.0.1:2381
    - --listen-peer-urls=https://10.74.107.43:2380
    - --name=master
    - --peer-cert-file=/etc/kubernetes/pki/etcd/peer.crt
    - --peer-client-cert-auth=true
    - --peer-key-file=/etc/kubernetes/pki/etcd/peer.key
    - --peer-trusted-ca-file=/etc/kubernetes/pki/etcd/ca.crt
    - --snapshot-count=10000
    - --trusted-ca-file=/etc/kubernetes/pki/etcd/ca.crt
    image: k8s.gcr.io/etcd:3.5.1-0
...
> etcdctl --cacert=/etc/kubernetes/pki/etcd/ca.crt --cert=/etc/kubernetes/pki/etcd/server.crt --key=/etc/kubernetes/pki/etcd/server.key get / --prefix --keys-only
/registry/apiregistration.k8s.io/apiservices/v1.
/registry/apiregistration.k8s.io/apiservices/v1.admissionregistration.k8s.io
/registry/apiregistration.k8s.io/apiservices/v1.apiextensions.k8s.io
/registry/apiregistration.k8s.io/apiservices/v1.apps
/registry/apiregistration.k8s.io/apiservices/v1.authentication.k8s.io
...
7.11 安装私有仓库
安装脚本
安装完后,为了使节点有权限访问仓库,需要在所有 Master/Worker 节点上运行(也可以使用其他方法,比如 Secret ):
如使用 Docker 作为 cri :
或使用通用的命令:
scp cisco@docker.finditnm.com:~/certs/docker-registry-root-ca.crt ./
cp docker-registry-root-ca.crt /usr/local/share/ca-certificates
update-ca-certificates
nerdctl login docker.finditnm.com
7.12 自定义输出格式
$ k get pods -o=custom-columns='NAME:metadata.name,IMAGES:spec.containers[*].image'
NAME                             IMAGES
kubia-7c845994ff-jw57c           ruanhao/kubia:v1
kubia-7c845994ff-mg6f5           ruanhao/kubia:v1
kubia-7c845994ff-nm5x6           ruanhao/kubia:v1
my-deployment-7df8999569-6qgmp   ruanhao/kubia:v2
my-deployment-7df8999569-7xrdb   ruanhao/kubia:v2
my-deployment-7df8999569-k7h2h   ruanhao/kubia:v2
my-deployment-7df8999569-mg644   ruanhao/kubia:v2
my-deployment-7df8999569-zlcjh   ruanhao/kubia:v2
my-pod-v3                        ruanhao/kubia:v3
test-pod                         ruanhao/kubia:v1
test-pod-v2                      ruanhao/kubia:v2
test-pod-v3                      ruanhao/kubia:v3
7.13 暂停调度
$> mv /etc/kubernetes/manifests/kube-scheduler.yaml /tmp
$> k run my-pod-v2 --image=ruanhao/kubia:v2 --port=80 --expose
service/my-pod-v2 created
pod/my-pod-v2 created
$> k get po my-pod-v2
NAME        READY   STATUS    RESTARTS   AGE
my-pod-v2   1/1     Pending   0          10s
$> mv /tmp/kube-scheduler.yaml /etc/kubernetes/manifests/
# wait seconds
$> k get po my-pod-v2
NAME        READY   STATUS    RESTARTS   AGE
my-pod-v2   1/1     Running   0          101s
7.14 查看 Requests/Limits 使用情况
$> k describe no worker2
...
Non-terminated Pods:          (4 in total) # Resource usage of all pods that are allocated on this node
  Namespace                   Name                      CPU Requests  CPU Limits  Memory Requests  Memory Limits  Age
  ---------                   ----                      ------------  ----------  ---------------  -------------  ---
  kube-system                 glusterfs-4bptc           0 (0%)        0 (0%)      0 (0%)           0 (0%)         2d16h
  kube-system                 heketi-7857b5964-v7g9m    0 (0%)        0 (0%)      0 (0%)           0 (0%)         2d16h
  kube-system                 kube-flannel-ds-tzdxh     100m (2%)     100m (2%)   50Mi (0%)        50Mi (0%)      2d16h
  kube-system                 kube-proxy-7v5ll          0 (0%)        0 (0%)      0 (0%)           0 (0%)         2d16h
Allocated resources: # summary of node resource usage
  (Total limits may be over 100 percent, i.e., overcommitted.)
  Resource           Requests   Limits
  --------           --------   ------
  cpu                100m (2%)  100m (2%)
  memory             50Mi (0%)  50Mi (0%)
  ephemeral-storage  0 (0%)     0 (0%)
  hugepages-2Mi      0 (0%)     0 (0%)
...
7.15 drain/cordon Node
# Remove all pods on the node, and put the node in Unschedurable state
k drain <node> --force --ignore-daemonsets
# Put the node in Unschedurable state (without deleting existing pods)
k cordon <node>
# Uncordon node
k uncordon <node>
7.16 升级流程
- Upgrade
kubeadmon master node - Use
kubeadmtool to upgrade master node - Upgrade
kubeleton master node- 这步完成后,记得执行
apt-mark hold kubelet kubeadm,即禁用自动升级
- 这步完成后,记得执行
- Drain worker node (will move pods to other nodes)
- Upgrade
kubeadmon worker node - Use
kubeadmtool to upgrade worker node - Upgrade
kubeleton worker node- 这步完成后,记得执行
apt-mark hold kubelet kubeadm,即禁用自动升级
- 这步完成后,记得执行
uncordonworker node- Repeat the same steps for other worker nodes
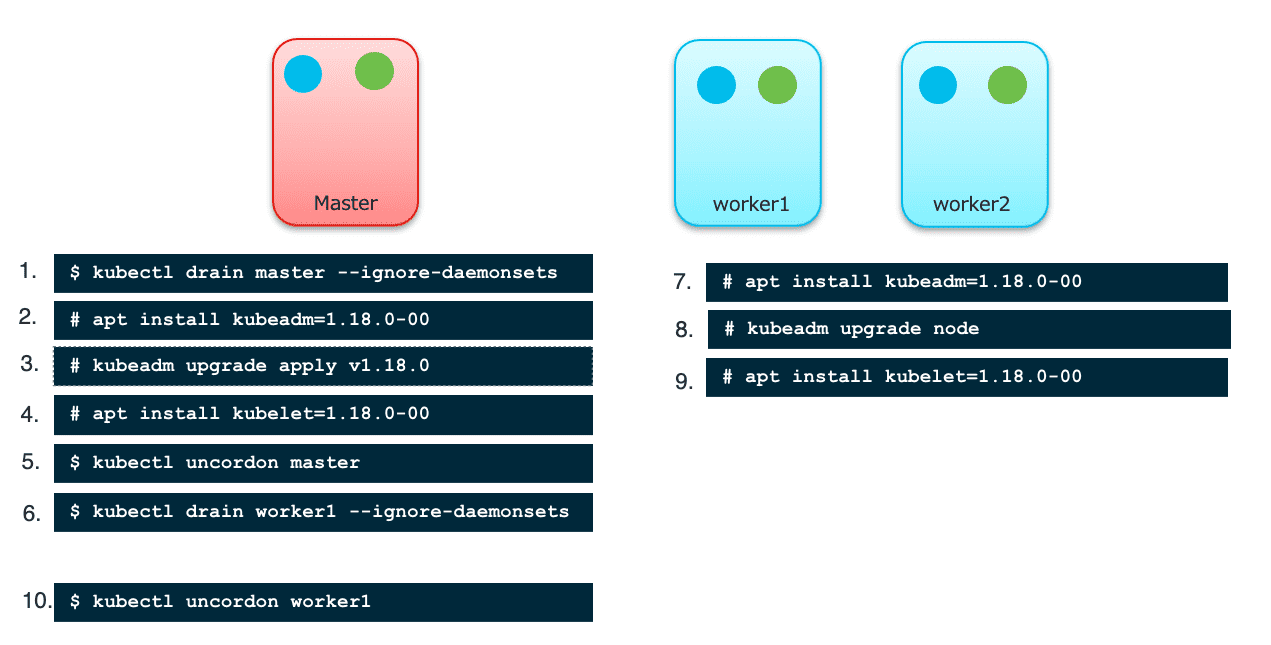
Figure 42: 升级 Kubernetes 流程
查看升级推荐:
(master)$> kubeadm upgrade plan
[upgrade/config] Making sure the configuration is correct:
[upgrade/config] Reading configuration from the cluster...
[upgrade/config] FYI: You can look at this config file with 'kubectl -n kube-system get cm kubeadm-config -o yaml'
[preflight] Running pre-flight checks.
[upgrade] Running cluster health checks
[upgrade] Fetching available versions to upgrade to
[upgrade/versions] Cluster version: v1.23.6
[upgrade/versions] kubeadm version: v1.23.6
I0515 21:24:35.981037  261265 version.go:255] remote version is much newer: v1.24.0; falling back to: stable-1.23
[upgrade/versions] Target version: v1.23.6
[upgrade/versions] Latest version in the v1.23 series: v1.23.6
7.17 备份所有应用配置
kubectl get all -A -o yaml >apps-configuration.yaml 【并非包含所有资源】
7.18 查看所有 Named Group 【非 Core Group】
$> k get --raw /apis/ | jq -r '.groups[].name'
apiregistration.k8s.io
apps
events.k8s.io
authentication.k8s.io
authorization.k8s.io
autoscaling
batch
certificates.k8s.io
networking.k8s.io
policy
rbac.authorization.k8s.io
storage.k8s.io
admissionregistration.k8s.io
apiextensions.k8s.io
scheduling.k8s.io
coordination.k8s.io
node.k8s.io
discovery.k8s.io
flowcontrol.apiserver.k8s.io
metrics.k8s.io
7.19 本地端口转发
An effective way to test an individual pod.
kubectl port-forward <pod-name> <local-port>:<pod-port>
7.20 获取所有节点 IP 【jsonpath用法】
kubectl get nodes -o jsonpath='{.items[*].status.addresses[?(@.type=="ExternalIP")].address}'
更多用法参考:JSONPath Support
7.21 强制删除 Pod
kubectl delete po mypod --grace-period=0 --force
7.22 拷贝本地文件
kubectl cp foo-pod:/var/log/foo.log foo.log
kubectl cp localfile foo-pod:/etc/remotefile