EVE-NG 使用手册
{Back to Index}
Table of Contents
1 EVE-NG 安装注意事项
1.1 开启 vSwitch 混杂模式

2 GROUP_FWD_MASK 1
2.1 转发 EAPol
for i in {1..6}; do echo 65528 > /sys/class/net/pnet$i/bridge/group_fwd_mask
2.2 转发 LACP
for i in {1..6}; do echo 16396 > /sys/class/net/pnet$i/bridge/group_fwd_mask
2.3 转发所有
for i in {1..6}; do echo 65535 > /sys/class/net/pnet$i/bridge/group_fwd_mask
3 VPC
3.1 查看 IP
VPCS> show ip

NAME        : VPCS[1]
IP/MASK     : 192.168.1.1/24
GATEWAY     : 192.168.1.254
DNS         :
MAC         : 00:50:79:66:68:02
LPORT       : 20000
RHOST:PORT  : 127.0.0.1:30000
MTU         : 1500
3.2 配置静态 IP
ip 192.168.1.1/24 192.168.1.254 # 192.168.1.254 is gateway
4 IOL 安装 2
IOL 占用系统资源更少,启动快,是模拟 Cisco 设备的较好选择。
建议 使用 IOL 设备模拟 Cisco 的二/三层设备。从设备运行效率,二层技术特性的支持等多个方面,IOL 比 Dynamips 更有优势,甚至可以完全取代 Dynamips 设备。
4.1 上传 IOL 镜像
上传至 /opt/unetlab/addons/iol/bin/ 目录。
4.2 生成 iourc 文件
iourc 是 IOL 运行时所必需的 license 文件。如果没有该文件,IOL 设备无法运行 成功,所以需要生成 iourc 文件。
首先上传脚本 CiscoIOUKeygen.py :
#! /usr/bin/python
print("*********************************************************************")
print("Cisco IOU License Generator - Kal 2011, python port of 2006 C version")
print("Modified to work with python3 by c_d 2014")
import os
import socket
import hashlib
import struct

# get the host id and host name to calculate the hostkey
hostid=os.popen("hostid").read().strip()
hostname = socket.gethostname()
ioukey=int(hostid,16)
for x in hostname:
 ioukey = ioukey + ord(x)
print("hostid=" + hostid +", hostname="+ hostname + ", ioukey=" + hex(ioukey)[2:])

# create the license using md5sum
iouPad1 = b'\x4B\x58\x21\x81\x56\x7B\x0D\xF3\x21\x43\x9B\x7E\xAC\x1D\xE6\x8A'
iouPad2 = b'\x80' + 39*b'\0'
md5input=iouPad1 + iouPad2 + struct.pack('!i', ioukey) + iouPad1
iouLicense=hashlib.md5(md5input).hexdigest()[:16]

print("\nAdd the following text to /opt/unetlab/addons/iol/bin/iourc:")
print("[license]\n" + hostname + " = " + iouLicense + ";\n")
print("You can disable the phone home feature with something like:")
print("echo '127.0.0.127 xml.cisco.com' >> /etc/hosts\n")
运行脚本并按照提示操作:
(venv3.7) root@eve-ng:/opt/unetlab/addons/iol/bin# python ~/CiscoIOUKeygenV3.py
*********************************************************************
Cisco IOU License Generator - Kal 2011, python port of 2006 C version
Modified to work with python3 by c_d 2014
hostid=007f0101, hostname=eve-ng, ioukey=7f0343

Add the following text to /opt/unetlab/addons/iol/bin/iourc:
[license]
eve-ng = 972f30267ef51616;

You can disable the phone home feature with something like:
echo '127.0.0.127 xml.cisco.com' >> /etc/hosts
4.3 修正权限
/opt/unetlab/wrappers/unl_wrapper -a fixpermissions
5 基于 OVA 的 QEMU 安装 3
(venv3.7) root@eve-ng:/opt/unetlab/addons/qemu/linux-cbd-20210412-xenial# cp ~/Cisco_Business_Dashboard-2.3.0.20210412-ubuntu-xenial.ova ./
(venv3.7) root@eve-ng:/opt/unetlab/addons/qemu/linux-cbd-20210412-xenial# tar xf Cisco_Business_Dashboard-2.3.0.20210412-ubuntu-xenial.ova
(venv3.7) root@eve-ng:/opt/unetlab/addons/qemu/linux-cbd-20210412-xenial# ls
Cisco_Business_Dashboard-2.3.0.20210412-ubuntu-xenial-disk1.vmdk  Cisco_Business_Dashboard-2.3.0.20210412-ubuntu-xenial.ova
Cisco_Business_Dashboard-2.3.0.20210412-ubuntu-xenial.mf          Cisco_Business_Dashboard-2.3.0.20210412-ubuntu-xenial.ovf
(venv3.7) root@eve-ng:/opt/unetlab/addons/qemu/linux-cbd-20210412-xenial# /opt/qemu/bin/qemu-img convert -f vmdk -O qcow2 Cisco_Business_Dashboard-2.3.0.20210412-ubuntu-xenial-disk1.vmdk virtioa.qcow2
(venv3.7) root@eve-ng:/opt/unetlab/addons/qemu/linux-cbd-20210412-xenial# rm -rf Cisco_Business_Dashboard-2.3.0.20210412-ubuntu-xenial*
6 部署 Linux
6.1 镜像
链接:https://pan.baidu.com/s/1L56_sEKnzWAT9ATG4dbh2w
提取码:8ror
Linux 登陆密码
root/eve@123
6.2 设置
mkdir /opt/unetlab/addons/qemu/linux-ubuntu-server-16.04.02
cd /opt/unetlab/addons/qemu/linux-ubuntu-server-16.04.02
unrar e linux-ubuntu-server-16.04.02.rar # hda.qcow2
rm -rf linux-ubuntu-server-16.04.02.rar
/opt/unetlab/wrappers/unl_wrapper -a fixpermissions
7 部署 Windows
7.1 Win10 镜像
链接:https://pan.baidu.com/s/1tA3yLDbOpUBcIo9ahpGdVw
提取码:k43m
Windows 登陆密码
user/Test123
7.2 配置
mkdir /opt/unetlab/addons/qemu/win-10-x86/
cd /opt/unetlab/addons/qemu/win-10-x86/
cp ~/virtioa.qcow2 ./           # 将解压后的镜像文件 (virtioa.qcow2) 复制到此目录
/opt/unetlab/wrappers/unl_wrapper -a fixpermissions
8 Commit/Compress 镜像
先将 Node 跑起来,在合适的时候 stop ,然后点击【 Lab details 】找到 Lab ID ,以 ISE 为例并假设当前 POD ID 为 0 :
9 Migrate qcow2 images VMWare
root@eve-ng:~# qemu-img convert -f qcow2 -O vmdk hda.qcow2 win7.vmdk
root@eve-ng:~# scp win7.vmdk root@10.74.107.146:/vmfs/volumes/datastore146/
[root@usc46-146:/vmfs/volumes/datastore146] vmkfstools -i win7.vmdk -d thin win7thin.vmdk

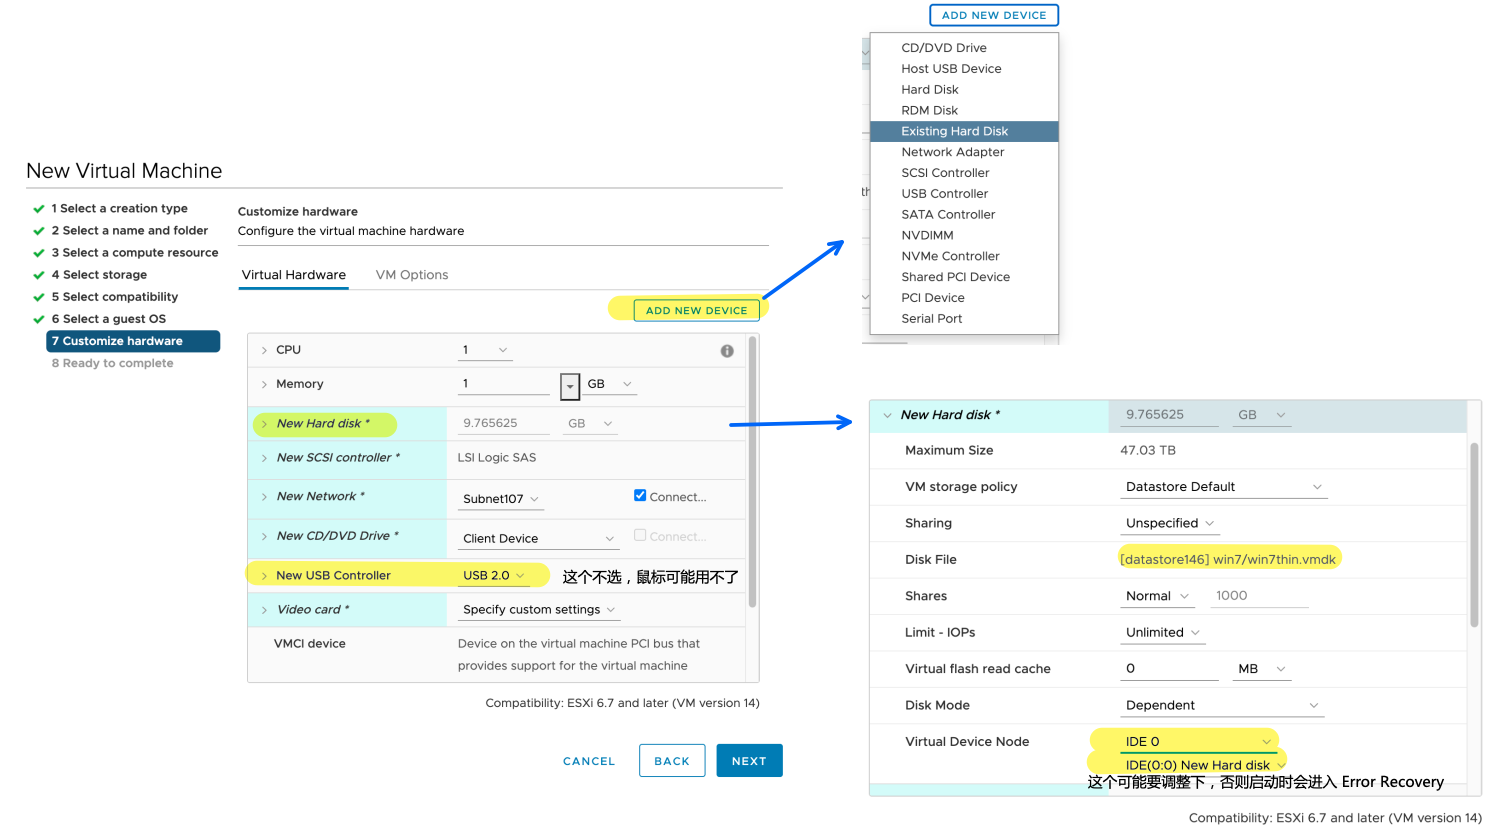
Figure 2: 创建新虚拟机
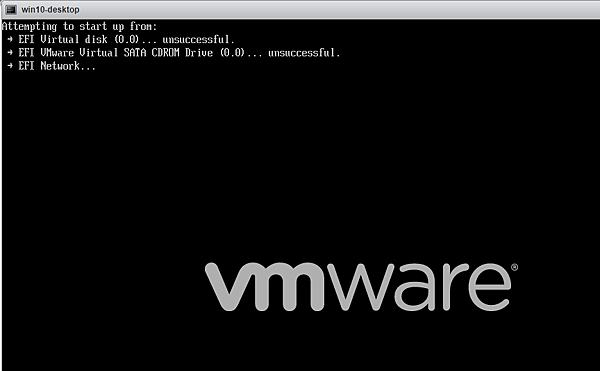
在安装 Windows10 如果出现 efi vmware virtual sata cdrom Drive (0.0) ... unsuccessful 错误,可以检查一下 VM Options 的设置,
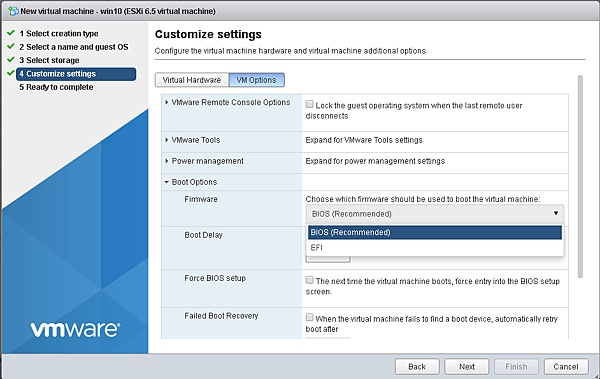
如果是 EFI 的话,改成 BIOS 再重新开机。


10 挂载 qcow2 镜像添加文件
root@eve-ng:/opt/unetlab/addons/qemu/asav-943# guestmount -a virtioa.qcow2 -m /dev/sda2 --rw /mnt/
root@eve-ng:/opt/unetlab/addons/qemu/asav-943# cp ~/anyconnect-win-4.4.00243-webdeploy-k9.pkg /mnt/
root@eve-ng:/opt/unetlab/addons/qemu/asav-943# umount /mnt/